I'll be gone this weekend, leaving early this morning with my sis & grandmother to drive the trip to Seattle again to see my dad. THIS time we're staying the night! I'm so anxious & excited to see my dad & mom. His birthday is in 4 days & I'm hoping to do something special. Not sure what. He can't eat cake. Or drink punch. Or blow party horns. Not sure if he'd appreciate a birthday hat. I'll have to think about it...
My dad had surgery again yesterday---his 3rd one in less than a month. Though the cancer is now gone, there's still some other problems that the docs are trying to fix up. It's been a scary journey & will continue to be a long healing process. And the whole "waiting with bated breath" thing? I'm turning blue from holding my breath so long.
See you Monday...

Saturday, January 31, 2009

Friday, January 30, 2009

Beanbag Tutorial

These beanbags are made from felt or fleece--your choice--as both materials do not fray when cut & it makes for a quick project! The other materials you'll need are: fabric, scissors, marker, ruler, contrasting thread, a sewing machine &...

...popcorn. Ok, so mine are not TECHNICALLY "bean" bags. But use what you have: beans, small pasta, rice, etc.

You can make whatever size you want. Mine are made by cutting 2 four-inch square pieces of felt/fleece.

Take one piece of felt/fleece & draw the design that will be the cut-out where the fabric will show through. As you can see, mistakes are perfectly fine. This will be on the inside of the beanbag, so it won't even show.


Take one piece of felt/fleece & draw the design that will be the cut-out where the fabric will show through. As you can see, mistakes are perfectly fine. This will be on the inside of the beanbag, so it won't even show.

Cut out your design.

Choose a piece of fabric & cut it smaller than the square, but large enough to cover the cut-out design. Make sure you lay it on top of the felt with the right side facing through the design.

Sew the fabric to the felt/fleece. I stitched as close to the edge as I could.

I actually stitched around a few times in a random haphazard way. It started out as a mistake, & then I realized I liked it.

Next, sandwich your 2nd piece of felt/fleece to the back of the cut-out felt/fleece. Stitch around 3 sides, leaving about 1/4" seam allowance.

Fill your beanbag with the beans. Or popcorn. Or the lentils that have been sitting in the back of your pantry for 2 years. I used about 1/3 CUP. The tiny people like to help with this part. And just have your broom handy.

Sew up the last side & trim up any uneven edges. Or leave the edges all nifty & askew. It's up to you.

One beanbag down! That took less than 10 minutes to make.
I made up the star beanbags with the Kindergarten girls last night in my Daisies group at church. I did the hard part first & they helped me sew the edges & fill it with beans. Look, I even made a personalized one! My nephew will love it!

Choose a piece of fabric & cut it smaller than the square, but large enough to cover the cut-out design. Make sure you lay it on top of the felt with the right side facing through the design.

Sew the fabric to the felt/fleece. I stitched as close to the edge as I could.

I actually stitched around a few times in a random haphazard way. It started out as a mistake, & then I realized I liked it.

Next, sandwich your 2nd piece of felt/fleece to the back of the cut-out felt/fleece. Stitch around 3 sides, leaving about 1/4" seam allowance.

Fill your beanbag with the beans. Or popcorn. Or the lentils that have been sitting in the back of your pantry for 2 years. I used about 1/3 CUP. The tiny people like to help with this part. And just have your broom handy.

Sew up the last side & trim up any uneven edges. Or leave the edges all nifty & askew. It's up to you.

One beanbag down! That took less than 10 minutes to make.

I made up the star beanbags with the Kindergarten girls last night in my Daisies group at church. I did the hard part first & they helped me sew the edges & fill it with beans. Look, I even made a personalized one! My nephew will love it!
The dark grey & purple beanbags in the middle row were both made using felt. The others are fleece.

My girls & their sparkly shoes. I gotta get me some.

My girls & I tested the beanbags out.

Yep. They work.
 I was thinking that you could even do the cut-outs on both sides. What about making the beanbags to spell out a word or someone's name? What about scented beanbags, adding a bit of lavender (or etc.) to your beans? And, of course, you could embellish the beanbag heck out of 'em too!
Next on my list of things to do is to find silly fun stuff to do WITH the beanbags!
Here's a link I found to get started...UPDATE: Custom beanbags now available in the shop!
Thursday, January 29, 2009
Thrifty Games Galore

Whenever I shop at thrift stores, I am always drawn to the games, puzzles, crafty bits, fabric, lamps, linens & old books. Oh yeah, & forks. I usually don't look at much else. Yesterday I totally scored at the thrift store. If I ever purchase games or puzzles, they're usually taped up & sealed shut. So, I never know what I'm bringing home. For an inexpensive price, I don't mind. If lots of parts are missing, I figure I can always use the leftovers for something creative & crafty-like. It's always a win-win ya know? It's never a waste.
I LOVE this "Original" Memory game from the 80's. My girls & I played it right away. All 72 cards were there! YAY! My favorite cards are the owlies, the yellow birdie & the strawberry.

Another 80's find was this Bugs Bunny & Taz puzzle. Yep. All 100+ pieces accounted for.

This next game HAS to be one of the most odd pieces I've ever scored. It's an adult drinking game from the 60's!! (It's for sale in the shop!) ((UPDATE: SOLD!)) Players travel around the gameboard taking drinks as instructed.
 The object of the game is to recite & collect 10 'Pink Elephant' cards. What's on those 'Pink Elephant' cards? Why, tongue twisters of course! Try saying "I stood on the steps of Burgesses Fish Sauce Shop, mimicking him hiccuping & welcoming him in." Or: "A cup of proper coffee in a copper coffee cup." If you mess up, you gotta take a drink & try again. The little game pieces are tiny whistles--that really work!

I think all our favorite games & puzzles are the good & old ones that we've collected along our thrifting travels. So, what things get your attention while browsing thrifty goodies?
Wednesday, January 28, 2009
Just Like Mom Used to Make...

My mom used to make pie crusts & other doughy goodness when I was younger & she let me have the leftovers to play with. I loved it!
Well, I decided to have some pie dough fun with my girls. I have NEVER made a pie crust. (Is that sad?!) And I wasn't about to start today. I just made the dough. I promise I'll make a real pie later.
 And then OUR fun began!
 The girls poked & smooshed & rolled the dough. Although I warned them that it wasn't terribly tasty, they even snuck a few bites. I could've made sugar cookie dough or something more tasty. But, it's just too easy to mix flour, salt, shortening & water.

We sprinkled it with cinnamon sugar...(just like mom used to let me do...)

 ...& baked them in the oven.
Nothing gourmet, it doesn't even taste that good, but it was just for fun!


Tuesday, January 27, 2009
Organizing on Paper.
 One thing I did last week was to get my brain really wrapped around the idea of organization. More specifically, organizing my days on a weekly planner. I have realized, about myself, that I like to play a lot. I like to have loads of silly fun. And that, sometimes, makes for a not-so organized girl. I've made lists before. Planned out my week in a sorta haphazardly way. But this time, I got VERY specific for each time slot of the day. I need that. This week is my first go at trying this out. We'll see how it goes. I sure know that not everything works for everybody when it comes to organizing & planning. I'm just trying to find out what works for me. (*I found the fill-in-the-blank heart weekly planner at The Dollar Tree a couple years ago.)
To begin, I used a pencil to get everything squeezed into each day. I knew the things I HAD to make time for every week: the girls school, prepping orders to be shipped, etc.
I knew the things I WANTED to make time for every week: making stuff, blogging, taking pictures, etc.
And, I knew the things that sometimes slack every week, but that I wanted to make a priority: making dinner EVERY night (instead of frozen items half the week), a thorough house cleaning once a week, etc.
And all those 'to-do's' got penciled in & erased & shifted around & penciled in again until I felt it was gonna work for me. And then I used a pen to make it a "reality".  And it was sooooo interesting to see a typical week from that angle, to see a different viewpoint of the days events. I could see where I had little pockets of time open. I could see where "the weekly plan" was going to help keep me from making things for hours & hours when I really should be doing other stuff. When it was all written out, I felt SO GOOD & so confident & ready to tackle each week & get things done & check things off my list every day.
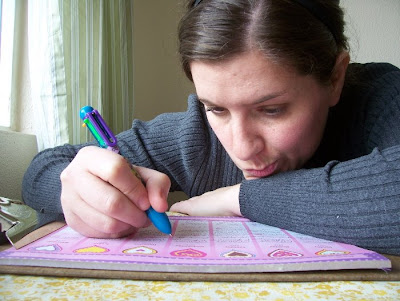
And it was sooooo interesting to see a typical week from that angle, to see a different viewpoint of the days events. I could see where I had little pockets of time open. I could see where "the weekly plan" was going to help keep me from making things for hours & hours when I really should be doing other stuff. When it was all written out, I felt SO GOOD & so confident & ready to tackle each week & get things done & check things off my list every day. Here's one example: I could see that every Tuesday & Thursday, after dropping the girls at school, I wanted to make "going to the gym" a priority. It got written down on my weekly planner. Then, after working out, I realized that I have about an hour of time leftover until I had to pick the girls up from school. I usually head home to shower & tinker around for that hour. But instead, I'm going to NOT go home, but use my time wisely & go grocery shopping, drop packages off at the post office or run other errands. Grocery shopping is miserable for the girls, & unless my errands include anything with the word "toy" in them, they could care less. I actually save so much time running errands when the girls are NOT with me. And after I pick the girls up from I school, I can drive home, hop in the shower, beaming with productive pride that the errands have already been done & decide what's on the agenda next: Old Maid or Crazy 8's?
P.S. Sorry so late in the day with this post. I was busy following my weekly plan. HAHA!
I must add one final note. This may seem like a list of duties to be done at precise & exact times, but what I'm doing is giving myself some guidelines throughout the day & what will end up happening is I'll be creating MORE time for myself to do the things I really enjoy doing.
Monday, January 26, 2009
Week in Review!
 For more details & photo descriptions, click HERE.
One thing I did this week, was to get ORGANIZED. On pen & paper. The whole "weekly planner" routine. More about that tomorrow...
I Highly Recommend This.
My best pally wally, Tia & I were trapped inside our locked vehicle. Windows rolled up. Soapy suds, in neon hues, attacking us. Giant swirling & twirling brushes approaching us with extreme centrifugal force. Massive rag-like sponges hovering on all sides. Hoses locked & loaded waiting for their turn to fire at us with a powerful force. There was no escape.
 Ok, so we were just at the car wash. And maybe being isolated in a car for that whole 3 minutes was too much for us. But, a little car wash drama makes for a silly fun day.
**Thanks for all who have entered my One World One Heart giveaway so far! I've officially doubled the entries that I had last year---412!! (There's still plenty of time to enter if you haven't done so.)
And here are my newest button creations: Vintage Button Brooches! As most of you know, I'm a huge button lover. And I keep getting more & more buttons added to my collection that are just too big to use for my Vintage Button Rings. So, I've decided to make these little floral lovelies with them. I'm totally getting into brooches lately too. Anyway, have a peek at the brooch HERE & don't forget that all the rings are 15% off thru Jan. 31st!

Saturday, January 24, 2009
RANDOM RING SALE!
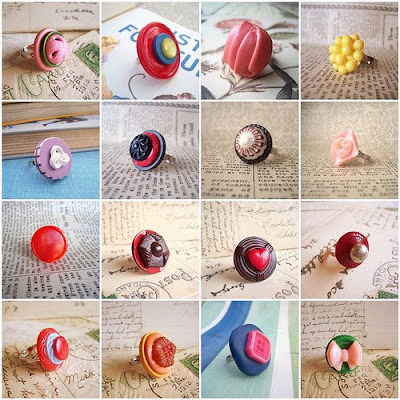 I need to make room in the shop for some new rings, & so, I thought I'd have a Random Ring Sale----& even include the new arrivals in the sale! YAY! Visit the 'Funk-o-Licious Jewelry' section of WhiMSy love to choose your favorite lovelies! Sale good through Jan 31st! (Prices already marked.)
(Newer rings arriving randomly throughout the sale!)
*You can also click on the picture to be taken to Vintage Button Ring Land.
Happy Weekend!!
Inspiration.

I recently received a special little book from a special little someone & I HAD to share about it: The Meaning of Life by Bradley Trevor Greive. It's a little book crammed full of big inspiration. There was so much in it that just sparked a fire in my spirit. (Thanks, Lydia.)
Here is one of my favorite bits from the book. (It was VERY hard choosing just one!):
"When you get the most out of your life, savoring every last drop, it will transform everything about you from ordinary to extraordinary. When you do what you love...you will be filled with a heartfelt joy that is highly contagious."
I don't like to talk TOO much about the personal, private adventures I take in life. But at a time when my family is going through a very real (almost surreal) & emotional journey with my dad's cancer, it makes my heart do something equivalent to the boogie dance to know that I am surrounded by generous souls.
I've been spending a lot of time assessing & sorting & prioritizing. I'm sure that's normal when you've had such a grand event suddenly consume your world.
And after accepting the role I've been given, I've decided that I'm ready to take risks & live big. I will try not to let a day escape me where I have not acknowledged that I am blessed. I will pursue the things I love & let the leftovers become roadkill. My joy will never be accused of being artificial.
I can't wait to wake up tomorrow!
Friday, January 23, 2009
Etsy Front Page!
 Wheeee! My Valentine Hanging Heart Cones made it to the front page of Etsy! Lower left corner.
Just braggin', that's all.
Nikki + Melvin = True Love.
 Say hello to Melvin the Mushroom! He's one of the most adorable handmade stamps EVERS! My Etsy BFF, Beck, surprised me with him. I think he is precious. I'm stampin' him practically EVERYWHERE!
I'm fond of many of the hand carved stamps I've seen on Etsy & I think that someday it would even be fun to try carving my own. I found THIS WEBSITE that explains the whole process pretty thoroughly. One of these days I may give it a crafty whirl. I'll let you know when that happens. For now I'll just share my favorite shops that carry the cutest handmade stamps: Craft Pudding , The Mayberry Sparrow, Cupcake Tree & WineMakersSister.
Look who got happy socks!
MAN. I have boat feet.
But seriously, I'm sick of this mucky, yucky, un-sunshiny, grey, kinda depressing winter weather & I needed something to help me cheer up. Funky socks did the trick!!!
 P.S. The Vintage Button Ring I'm "modeling" is for sale in the shop. This weekend I'll be stocking 'WhiMSy love' with even MORE super fun rings & some new button surprises!
Wednesday, January 21, 2009
French Toast.
 I love breakfast. In fact, my family & I often eat it for dinner. And French toast is one of my most favorite breakfast-type foodies. It is SO easy to make. Easier than pancakes. ALMOST as easy as pouring a bowl of cereal.
 2 eggs, 1/2 CUP milk, 1/2 teaspoon cinnamon, 1/2 teaspoon vanilla. Mix in a bowl. Dip your bread, a few seconds on both sides.
 Cook those babies up, both sides. DONE.
Oh, it smells so good!

 It brings my girls running to the kitchen. And my 4-year old looks on in part annoyance, part confusion & wonders why mommy just won't feed her already. (Me & my picture taking, ya know.)
And for those of you with kidlets who don't know this trick already: a pizza cutter works EXCELLENT to cut anything from sandwiches to....well, pizza.

It looks like even Tinkerbell has joined us for breakfast. I notice her tiny cup & miniature plate on the table.

Our favorite topping is butter & powdered sugar.

I usually eat the crusts first. And then I'm left with the ooey gooey center. Mmmmm. I could eat French toast every day.

It's an all-day-jammie-day. And we are chillin'. Maybe we'll save you some next time. Or maybe not.

I usually eat the crusts first. And then I'm left with the ooey gooey center. Mmmmm. I could eat French toast every day.

It's an all-day-jammie-day. And we are chillin'. Maybe we'll save you some next time. Or maybe not.

Subscribe to:
Posts (Atom)