Showing posts with label recipe. Show all posts

Wednesday, April 2, 2014

Banana Boats

This treat was a new one to me at Camp Wooten just recently. It was so yummy, I had to share!
I know you can make these over the campfire or even on the grill, but we baked these in an oven set at 350 degrees F.
These are so simple to make! The kids will enjoy helping out too.

The ingredients we used at camp were:
bananas
mini marshmallows
mini chocolate chips
Reese's Peanut Butter sauce
BUT, I have no idea where to get that heavenly peanut butter sauce. Like, it was a big ol' tub of magic awesomeness. So, I opted for the Reese's peanut butter chips instead. 

First, slice the top & bottom off of your bananas.
Then, slice it lengthwise, through most of the banana, but not slicing through the peel on the other side.
At camp we placed our bananas inside paper food trays, but at home I just crumpled up some foil to hold the banana in place.

Line your banana boats on a cookie sheet.
Next, cram them full of mini marshmallows & mini chocolate chips. (And the peanut butter chips.) We even purposefully let some fall all around the sides too.

Lastly, drizzle with peanut butter. (If you have it. If not, no biggie.)


Bake until the toppings get all ooey gooey & the skin of the banana is black. It took about 15 minutes. But just keep peeking at it until you notice it's done.
The banana gets all soft & delicious. Just use a spoon to scoop-&-eat!


There are tons of toppings you could add or substitute: drizzle with caramel, sprinkle with butterscotch or white chocolate chips, toss on some nuts. You get the idea.

Saturday, June 1, 2013

DIY: Deep Fried Oreos

Have you ever eaten a deep fried Oreo?
I had never even heard of such a thing until I moved to Nebraska. The first time I tasted one was last fall. They are so yummy. And so unhealthy. But it's fun to have a decadent treat every once in a while.
And here's how to make your own! They are so easy to make too. Which could be bad.

First, heat up a pot of oil. (I filled a small cooking pot with about 4 inches of oil.) I didn't have a thermometer, but I set the pot on the burner between medium to medium high heat. I've looked online & seen recipes call for the oil to be anywhere between 335 - 375 degrees F. You can test things out to see if the oil is hot enough by dropping in a blob of batter. If the batter bubbles & starts cooking things up, then it's ready. If it's too hot, it will cook the batter so fast & burn it.

Ok, now for the batter. I used 'The Ultimate Pancake' recipe on the back of my Bisquick box.
2 CUPS Bisquick mix
2 teaspoons baking powder
2 TABLESPOONS vegetable oil
1 teaspoon vanilla
3 TABLESPOONS sugar
1 cup milk
2 eggs
Mix that all together in a bowl. 

Dip the Oreos in the batter, one at a time, coating every bit of the cookie. Then carefully & quickly drop the cookies in the hot oil. When the cookies have turned dark golden brown on one side, carefully flip them over with a slotted spoon until the other sides gets equally fried. It should take about 30 seconds to cook on each side. That's just an approximate time. It shouldn't take 2 minutes per side, that's all I'm sayin'. Then pick up the cookies, with the spoon, & let them drain on a plate covered in paper towels. 
Dust with powdered sugar & watch them disappear!


This is, SERIOUSLY, a difficult activity to photograph. Everything gets eaten up so quickly.
(This photo was taken as we celebrated a friend's birthday. I made a tower of Deep Fried Oreos.) 
BUT, I do happen to have two Vines to show you. The first is a quick 6-second tutorial. The second is Pazely & I eating the dangerously delicious treats.


Enjoy!

Thursday, April 11, 2013

Breakfast Bites


Zoey's 4th grade class is working on a marketing project in social studies. The kids each had to come up with a food---real or not---& then go through the steps to market it. First, they had to make a billboard advertising their product. (A large piece of posterboard.) Then, they had to come up with packaging—which included a picture of their product, nutrition facts, ingredients, price & weight. Lastly, as an option, they could make the product & bring it to school to share with their friends.
Zoey & I came up with the idea of pancakes in miniature cupcake form. And then she ran with the idea. She calls them "Breakfast Bites". I call them "Pancake Cupcakes". Although, technically, they are more like muffins.

We thought we'd share the recipe with you...

To make approximately 30 breakfast bites, you'll need:
2 cups Bisquick
1 cup milk
2 eggs
9 pieces of bacon
maple syrup
non-stick cooking spray
mini muffin tin
optional: mini muffin/cupcake paper liners


1. Cook up the bacon & chop it up. Set aside to use later.
2. Prepare the muffin tins: Either spray with non-stick cooking spray OR use mini cupcake liners sprayed with non-stick cooking spray. (We baked a batch of Breakfast Bites without spraying the cupcake liners & the cupcakes stuck SO badly to the sides of the paper!!! It was a mess. UGH. On the other hand, the Breakfast Bites were so delicious that Pazely & I actually ate some of the paper liner without realizing it.)
3. Mix the Bisquick, 1 cup of milk, & 2 eggs in a bowl until combined well.
4. Fill your muffin tins/paper liners with the batter, almost to the top. (They puff up really nicely & form that perfectly adorable "cupcake" shape.)
5. Grab that bacon & sprinkle a little bit in the middle of each cupcake.
6. Bake at 375 degrees for 10 minutes.
7. When the cupcakes have cooled for several minutes, squirt* the middle of each with about 3/4 teaspoon of syrup. (We used the really good stuff: 100% pure organic maple syrup. If you have never tasted real maple syrup, it's worth the extra dollars to have a taste! Move over Mrs. Butterworth...)
*We inserted a squirty tube into the middle of each Breakfast Bite & injected the syrup, but you can use a syringe.


These are not too sugary/sweet, so they are perfect for a quick bite-to-go at breakfast. But you could get creative with some maple bacon frosting or brown sugar/cream cheese glaze & serve them at a party or for dessert. And then, they would be real grown-up cupcakes.

Although I have not tried yet, I am betting these will freeze really well. From the freezer to the microwave in just a few minutes! And, of course, you could make regular sized versions of these, just adjust the baking time. (The girls enjoyed Breakfast Bites for breakfast this morning with some fruit & a glass of milk.)

Zoey brought her Breakfast Bites to school this morning & I can't wait to hear how her classmates liked them. She was so proud & excited! I'll be sure to update this post with photos of her billboard & packaging. (Can't believe I forgot!)

Pssst! Here are the pics...


While baking in the kitchen, Zoey decided to take a break to go outside & romp around. 
In the snow. In her socks. 

Saturday, October 27, 2012

RECIPE: Wassail

I just realized that I have never shared my wassail recipe. It's one of my favorite cold weather drinks & it's always such an occasion when I make it. It always gets rave reviews & I hear lots of "yum's" when people sip it.
I got the recipe from my sister-in-law. 

2 quarts apple juice or cider (1/2 gallon) (I have only ever used cider)

1 pint cranberry juice (2 Cups)

¾ cup sugar

1 tsp. aromatic bitters

2 sticks cinnamon

1 tsp. whole allspice

1 orange, studded w/whole cloves

1 cup rum (optional) (I have always opted for the non-alcohol version, so I'm not sure what it tastes like with the rum)
Put all ingredients in a crock pot. Cover & cook on high for 1 hour, then on low for 4 to 8 hours.  Serve warm from crock pot.

(I don’t know what aromatic bitters are, so I have never used them in the recipe.)
Enjoy!


Saturday, January 28, 2012

Biscuits & Gravy

For the last few Saturday mornings I've been making big breakfasts before the fam heads off to Zoey's basketball game. (I'd love to cook big brekkie's every Saturday, but it just doesn't always happen.)
This morning was a first: biscuits & gravy. I know, I know: "WHAT?!"
I'm just not a fan of this meal.
I dislike sausage, which is all I ever see in a traditional 'biscuits & gravy'.
So, I found a recipe to replace the sausage with bacon!
SO AMAZING!!!
I didn't have a chance to get the gravy photographed.
(Hungry guests consumed it very quickly!)
The picture up top is of the leftover biscuits.
I used THIS recipe as a starting point.
I used a whole package of bacon & doubled up on the flour & milk.

Sunday, September 4, 2011

On the menu...

I remember my mom making grocery lists when I was younger & she'd always ask for our input & ideas when trying to come up with meals for that week. I'm afraid we weren't really helpful. "I don't know mom. Just cook what you always cook." I was always certain whatever she cooked would be yummy & scrumptious. Except if it was split pea soup. Or something to do with saurkraut. Those weren't my favorites. Now, the creamed eggs on toast was a smashing hit. As was her lasagna. And chili.

Flash forward some twent-five years later, & I'm in the same predicament: can someone please help me put this grocery list together?? I ask my kids & hubby. And I get the same responses every week: it's either silence, or "I don't know's" or someone will suggest we eat banana splits for supper.

But now, I have Pinterest to aid where the fam cannot. I admit that most of the pins on my "Tasty Eats" board involve sweets & desserts, but there's other stuff in there too. And you can be certain it doesn't include one recipe for split pea soup!

So, here's what's on the menu for the next few days...

Grilled Chicken Cobb Salad (Made this last night. YUMMERS!! Served with THESE corn fritters, which have become a summer favorite this year.)
Zucchini Waffles (I love breakfast for dinner!)
Tater Tot Casserole (A family favorite & frequently cooked one-dish meal!)
Meatballs in Tomato-Basil Cream Sauce (This will only be the second time I've ever made meatballs! And these meatballs look super easy to make.) (UPDATE: The meatballs were soooo easy to make. My 8 year old made them! They were so moist & delicious!)
► Hoping to attempt this Rustic Plum Tart next week also.
► For Labor Day there will be some steaks a-grillin', along with a really yummy grilled potato salad. To make the potato salad: halve or quarter about 1 1/2 pounds of baby new red potatoes. Secure them in a foil packet: folding foil over & crimping edges to seal. Grill on your BBQ, turning over once, until potatoes are tender, about 25 minutes. (THEY TASTE AMAZING!!!! My kids wouldn't stop eating them!) Follow Step #2 HERE for the potato salad dressing.

When I was a kid, my family sat 'round the table & ate mom's lovely homecooked meals.
Every. Single. Night.
Though I'm not as awesome in the kitchen as mom was (& still is), & though I don't frequent the kitchen as much as she always did, I sure try my best.
Although, from the look of that menu, it appears that I'm well on my way to being awesome... At least for this week anyway.

Monday, April 11, 2011

Foil Dinners


I recently made foil dinners for my birthday. The first time I made them was when Tia & I grilled some around a campfire a couple summers ago--on one of the hottest days of the year. I think it was 105 degrees or something?? We were dorks.

Foil dinners are so easy to make! And fun, too! The kids can get involved making their own---choosing whichever meat & veggies they prefer.

I used hamburger, but you can use whatever meat you want--cooking times will just vary. All you do is grab 2 pieces of foil, about 12 inches, & double them up. Shape a burger patty--salt & pepper it up--& place it (uncooked) in the middle of the foil. I would use a burger that doesn't have a lot of fat in it. 85/15 is what I used. Next, chop up all sorts of veggies. I used carrots, little red potatoes, & celery. What about asparagus? Zucchini? Onions? Etc. I cut them no bigger than 1". I also opened a can of green beans & sprinkled some of those on. What about canned corn? Canned peas? Etc.
I plopped all the veggies on top of the patty.

Now you'll open a can of cream-of-chicken soup & place 3 heaping spoonfulls on top of the veggies. Cream of mushroom soup would work too. (But I hate mushrooms! BLECK.)

Sprinkle everything with your favorite seasoning. I have a seasoning salt I like to use to flavor food. And also a mesquite burger seasoning which is quite yummy.

Meet two sides of the foil in half & fold down tightly. Fold the remaining ends up tigtly as well. Make sure the juices won't leak out.

Place the foil packets in a 400 degree oven for 45 minutes to 1 hour. Check after 45 minutes & see if the meat is cooked & the veggies are tender. It will be REALLY juicy & VERY hot!

I fit 8 packets in my oven--these make GREAT leftovers for lunch!
Try making foil dinners with strips of steak. Or, chicken tenders with veggies---sprinkled with olive oil, lemon juice, garlic, & herbs. Mmmm...

Click HERE for some foil dinner recipes from Cooks.com
Happy Foiling & Munching!!


Wednesday, January 6, 2010

Fireside Mocha


My sis-in-law sent me some of this for Christmas. I thought it would be a great recipe to share.


  • 2 Cups CoffeeMate or any powdered creamer


  • 2 Cups Hot Cocoa mix


  • 1 Cup Instant Coffee


  • 1 Cup Sugar


  • 1 tsp. Cinnamon

Put it all in a big bowl, stir it up, and put into containers of your choice. {I got my container at a thrift store. But a simple cellophane bag tied with ribbon would be sweet too!}You can also use flavored creamers if you want. Or powdered peppermint in place of the cinnamon.


To make my felt-n-button medallion just stack pieces of felt atop one another & stitch together by adding a button. Punch small holes in 2 opposite corners, thread twine through & tie around container.


I made myself a cup yesterday while hanging out with my bestest bud Tia. Even though we're now 1200 miles apart, we're continuing our Tuesday Tia/Nikki dates via Skype. I'm so excited! Anyway, we were searching the 'net & found THIS awesome site with lots more dry beverage mix recipes.
Have fun!


Saturday, December 12, 2009

Happy Sticks


I have my first "ladies" event at church tomorrow since I've arrived in Bridgeport. The women are getting together for a Christmas party. We'll be having a candle exchange AND a chocolate exchange. (Instead of a cookie exchange. Doesn't that sound pleasantly nifty?!?!)


I needed a quick & fast idea, so my pal Tia came through with her pretzel rods. I call 'em Happy Sticks. They were just what I needed: they are very easy to make! (And sorry for the awesome kitchen lighting in the photos. I made the rods mostly at night.)


I bought a bag of that Almond Bark stuff (mine wasn't called Almond Bark though) & it comes in those rectangle blocks. I melted all 12 blocks, purchased 3 bags of pretzel rods (not all were used & they can be found in the chip aisle) & squeezed out 86 chocolate covered pretzels.


Just melt your chocolate, dip your pretzel in the choclate (spoon it on, leaving anywhere from 1-2" at the end uncovered) & lay it on wax paper to dry. When it's dry, melt white chocolate & drizzle it on. My drizzle technique needs some work.


I stuck 3 each in cheapo bags I got from Walmart & then tied it off with torn strips of fabric. Nothin' fancy pants about it!


There are many variations you could experiment with as far as chocolate used, coloring & flavor. (Add some green food coloring & mint flavoring to the white chocolate!)
Cheers to happy & easy homemade sweets! (This one is good ANY time of year too!)

Saturday, September 19, 2009

i am awesome.


At least I'm pretty sure I am.
Did you know you can cook an egg in the microwave? Maybe you did. But I learned this trick about 10 years ago. And then forgot about it. But then I remembered again as my girls started school & I needed some quick breakfast ideas. This is one of 'em.

I make an omelette-style egg sandwich. Here is the recipe:
To make one you'll need an egg, an english muffin, butter, bacon (or lunch meat: ham), cheese, & salt-n-pepper to taste.


Find a bowl that's base is no wider than the circumference of the english muffin. I have this set of salad bowls that works perfect. Crack yer egg in the bowl. Now sprinkle some pre-cooked chopped bacon & shredded cheese on top. I didn't have bacon at the time so I made these with lunch meat (ham) that I slicked in little squares with a pizza cutter. Beat that all together in the bowl. Salt-n-Pepper that sloopy sloppy mess.


Microwave for 45 seconds. Your egg will still be a bit runny. So grab a clean fork & gently flip the egg blob over in the bowl. Now microwave for 20 more seconds. Of course, all microwave times will vary. My micro has an output of 1000W.


While you're nuking your egg mixture, you can start toasting your english muffin. Butter it up a bit & slide your eggs onto the muffin when the cooking process is complete.

Wasn't that fun?

Monday, September 14, 2009

Tater Skinz

I HAD to share the recipe for these tater skinz. I made 'em for the first time last night for hubby to take over to a buddie's house for football-game-watching with the guys. It took a bit of time to make but WELL worth it. In fact, I ate just two of them--& that was my dinner! They are filling & delicious & they turned out perfect! Mr. WhiMSy love returned home with an empty pan too.


Friday, September 11, 2009

Fruit Leather

We blanched. We peeled. We cut. We pitted. We sliced. We mashed. We puréed.
We poured. We baked. We waited. And waited. And waited. And after all that we ended up with fruit leather!
I actually have mixed feelings on the whole fruit leather thing. Mostly it's that my first attempt wasn't a complete success so that's a bit frustrating.
I followed THIS recipe.
Blanching the peaches made life very easy. And the 5 year old was able to help, so that was fun! She even used a plastic knife & helped me slice 'em up.
The recipe calls for 1/2 CUP of water for every 4 cups of sliced fruit.I freaked out at how much water I had to add to the already juicy watery sliced peaches. So I omitted some. I would just follow the recipe straightway through next time.
I also had a hard time deciding on whether to add sugar or not. I used 19 peaches, which ended up slicing into about 9 cups of fruit. I wanted to go all pure & keep it natural, but after tasting the purée I decided I definitely needed to make it sweeter. I added only 5 Tablespoons of sugar, but I'm thinking I should've added more. It's all a matter of personal taste when you're making fruit leather. I did add about a teaspoon of lemon juice too.
After mashing the simmered fruit, my blender worked wonderfully for making a purée. I was thinking I needed a food processor. Nope. It was so smooth & pretty looking.
I made 2 pans of fruit leather. One pan was a rectangular cookie sheet that I lined with parchment paper. The mid-section of the pan cooked a lot slower (warped pan?) & I ended up ditching a small section of the leather in the middle since it cooked unevenly & I needed to get it out of the oven. I also used a circular pizza pan that I lined with microwave safe/heavy duty saran wrap. Both the parchment & saran wrap worked, but I prefer the saran wrap--which I had to go out & purchase since I just had the wimpy kind: which WILL melt in your oven if you use it!
Also, my oven will only set as low as 170 degrees. The recipe says to set your oven at 140 degrees. I cooked the leather for 8 hours. I think I should have taken it out earlier though. It was a tiny bit tough, though we are still managing to much on it, somewhat.
I sliced it with a pizza cutter in small strips & wrapped it in saran wrap.
The girls have mixed reviews on the fruit leather.

In conclusion...
*I will definitely try it again.
*I'm excited to try a different fruit. Cherries! Strawberries!
*The taste of my peach fruit leather is a bit off & I'm not sure why.
*I cooked it a bit too long. I'd watch it closer next time.
*A good pan is important. (I was impressed with how evenly the pizza pan cooked. If only I'd taken it out about 40 minutes earlier it'd be PERFECT!)
*I {heart} heavy duty/microwave safe Saran Wrap.
*My mom said we made fruit leather when I was a kid & we dried it on the roof. Awesome.

Tuesday, September 1, 2009

Snacktime. My Favorite Time of Day.

Spread some chocolatey frosting love on one side of a graham cracker.
Then spread some peanut butter gooey goodness on the other side.
Smoosh together & die of snack happiness.
(Not necessarily a healthy snack. But hey, I threw some apples in the mix.)
Please, share your favorites so I can add them to my list of after-school snack ideas!

Tuesday, August 4, 2009

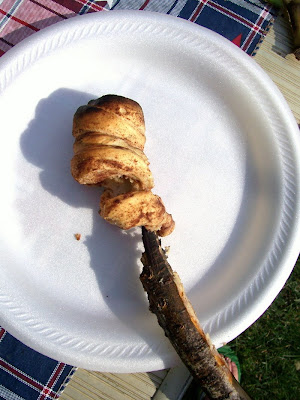
Campfire Roasted Cinnamon Rolls

We ate these one morning while camping last weekend. And I give credit for the idea to my friend Tia.
To make them, you need a tube of cinnamon rolls, sticks & a campfire.

Just an FYI: When Tia & I made these, she had purchased the Pillsbury brand & found that they did not come in a "spiral" shape like the cheap brand I purchased did. They both still worked, but it's easier if the dough is already in the "spiral" form.

Twist the dough around the top of your stick.

Pinch the ends to prevent the cinnamon treat from falling off the stick during roasting.
Roast over a fire, just like you would a marshmallow. Hot coals are best---not a flaming fire. You'll have to be patient, because they don't cook up as fast as a marshmallow. So, keep watching it until the outside is golden & the inside is cooked.
When it's done & lookin' tasty, slide the cinnamon roll off the stick.

Cover with frosting & munch away!

Or, you can get all savage & eat it right off the stick. haha!
(You can also do the same thing with the tubes of biscuits or dinner rolls.)