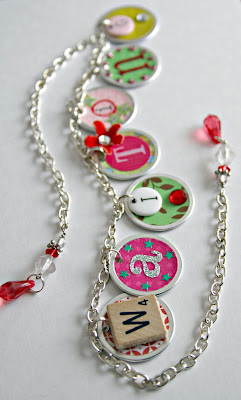
I originally saw a banner made with small tags hung from a chain in a home decor magazine about 5 years ago. Home Companion, I think?? It was a patriotic banner. I took the idea & ran, attacking it with all sorts of crafty supplies & embellishments. I'm so happy to share with you the "How-To" for making my Mini Tag Banners.
Each tag is made from those round circular tags, with the metal edges, found at office supply stores, or Walmart. You can purchase them with strings attached, or metal keyrings. I prefer the keyrings, as it gives me more options. You'll see what I mean later on.
After you've decided what you want your banner to say, choose the appropriate number of tags & then remove the string or rings that came attached. And then comes the part I love: choosing papers & letters. I love this part! Did I say that already? I have {unintentionally} collected all sorts of alphabet stickers over the years. It's quite fun to mix & match! And don't forget about plastic letter beads (like in the picture below) or even scrabble tiles.
You'll notice that the round tags have a wider metal edge on one side--which I call the "front side", & a thin metal edge on the "back side". A 1-inch circle punch creates the PERFECT size circle for the front side. However, the back side is a wonky size. You could just simply trace around the tag & cut a circle with scissors & be done with it. But I like the metal edge to show...
...so I found this handy trick, which might not even be that handy at all, but it's how I do it. I place my piece of paper on top of the tag, back side of tag face-up. And then I use one of those embossing tools & push hard around the edge of the metal circle. It creates the correct-sized circle.
I cut around the embossed circle shape & there it is!
At this point you can adhere the letter stickers to your circles. If you have any rub-on letters, apply those now too. Then, it's time to glue your paper circles onto the tags. I use Mod-Podge. Once the papers are attached, spread another coat of Mod-Podge over the front & back of the newly-papered tags, & over the stickers & rub-ons too.
When the tags are dry, you can punch a small hole near the top of each tag & attach them to your rings. If you purchased tags with rings already attached, & you like the look of those, you can RE-attach those. I often opt for using split rings found in the jewelry dept. of craft stores, or Walmart. I think I use the 9mm ones. Split rings are exactly like keychains, only teeny tiny.
Now it's time to embellish! Pull it all out: glitter, buttons, gems, sequins, flowers, punches, etc. When everything is attached (with a glue gun or E6000), I seal over things like glitter, paper punches & flat sequins with Mod-Podge. It all dries clear, so no worries.
When your tags are all pretty-like, you can loop them onto the chain. I usually use chain that is also found in the jewelry dept. of craft stores, or Walmart. I don't know what it's called. But, if you prefer a more industrial look, I have also purchsed chain from Home Depot. They'll cut whatever length you want. That industrial look goes quite well with the split rings that come already attached to the round office tags.
As far as the length of the chain, I like to have about 3-4" hang off each end. But you can do it how you want.
The final step in completing your Mini Tag Banner is finishing off each end of the chain. I'm not a jewelry maker. Though I have a few tools & supplies, I have no idea what I'm doing with them. I just slap some beads onto some wire, or better yet: some head pins or eye pins, & then I loop-de-loop the wire & twist it all up in a little messy bunch until I know those beads won't budge! And you know what? It works. So, don't be intimidated by that part.
The banner shown throughout the tutorial is for a customer who requested a holiday design that read "WAITING"....a reminder that we are waiting for Christmas, but also for Jesus to come again.
Here are some other designs I've created in the past, to give you some ideas & inspiration...
 |
| "Joy" |
 |
| "Happy Birthday" |
 |
| Custom for etsy shop 'B-Dazzled!' |
 |
| "Happy St. Patrick's Day" |
 |
| "Relax" |
 |
| "Nerd" |
 |
| "Dork" |
 |
| "Celebrate" |
 |
| "Boo!" |
♥


very nice..i like to do it..hehehex..=)
ReplyDeletethese are really cute. can you show some examples of where you would display them?
ReplyDeleteYou can hang them anywhere! Above a doorframe, above a framed photo, mixed into a collage of wall hangings. My walls here are made of kryptonite or something, otherwise I would have tacked some up for photos!
ReplyDeleteI've had customers use them at Craft Shows to display their shop names or hang them in shadow boxes for display.
I recognize that "Dork" banner! It's now hanging proudly in my room! I think we may need to do a crafty swap again sometime soon Nikki!
ReplyDeleteMadeline
Again, Amazing tutorial! These would make some really cute bracelets and thank you embellishments for loot bags etc.
ReplyDeleteWhat a cute idea for all the mismatched letter stickers I have. And I have a bunch of those tags! Wonder if it would be cute hanging from the Christmas tree?
ReplyDelete