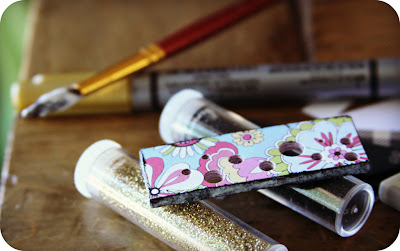
I'm a sucker for cute pendants & I do believe these do-it-yourself charms deliver, with the help of EKSuccess Tools!!
EKSuccess sent me a box of goodies to try out. Remember my unboxing video? Yeah, they shipped me oodles of sweet crafty supplies! And bonus? Each package of EKSuccess Tools has a QR code printed right on it. Scan the code with your smartphone to see videos showing helpful tips & project ideas!
I came up with this simple project using only a few items. I'll be showing you how to make the rectangle Swiss cheese pendant, with a few tips at the end on how to make the floral & circular pendants as well.
The basic concept is this: Punch out papers. Glue papers together. Done.
(Well, there's more steps in between, so follow along to make your own!)
And, yes, there are loads of pictures, details, & descriptions. Believe me, it's an easy project.
You know me: picture happy & wordy.
All the supplies pictured are from EKSuccess. (EKSuccess products are available at select Walmarts.) To make the rectangle pendant, you'll need:
•Swiss cheese punch (I love crazy polka-dots!)
•Rotary cutting tool
•Glitter (in your choice of color)
•Fine point scissors (These are great for precision cuts!!)
•Gold marker (It has a different sized tip on each end!!)
•Glue stick
You'll also need:
•Mod Podge
•Paper or Cardstock (in your choice of pattern/colors)
•Split rings
•Ball chain (or other necklace chain)
The cool thing about this project is that you can use up your paper scraps. First, choose a pretty patterned paper or cardstock you'd like to use for the front & back. These pendants can be made reversible, so choose 2 different patterns of paper for 2 completely different looks!
All the other papers sandwiched in between the front & back papers can be whatever color/pattern. You won't see them in the end. So, get out the papers from your not-so-favorite-paper-pile.
Cut your paper/cardstock into strips of paper that are 3/4" thick using the rotary cutter. I love this thing! Glides smooth as butta. Depending on the thickness of your paper/cardstock, & how thick you want your pendant to be, you'll be cutting out anywhere from 10-20+ pieces. (I used about 14 pieces of heavy paper in all of my pendants.)
Next, punch the strips using the Swiss cheese punch. Even though this punch has really cool guides to help you line up your design for evenly Swiss cheese dots all in a row, you won't be using that feature for this project. You'll want to leave space between your punches so you can cut out individual rectangle pieces to stack together in a later step.
Decide how long you want your pendant to be, keeping in mind that one of the holes near the top will be used for looping a split ring for your ball chain necklace.
Carefully, carefully, carefully, match up the dots on each strip of paper & cut them all the same length using the fine point scissors. My paper strips were just under 2 3/4" long.
And then carefully, carefully, carefully glue them together, one on top of the other, using the glue stick. Glue your top & bottom pieces on last, to prevent any dirty finger smudges from getting on them.
Pinch each layer together really well, smoothing it out & making sure the edges are all glued down & everything is lined up correctly.
Once the glue is dry, color around the edges with the gold marker. This part is probably not TOTALLY necessary, but it helps prevent any of the paper from showing through when the glitter is applied. And if you have a marker that matches your glitter color, even better!
And now for the glitter!!!!!!!
First, apply some Mod Podge to the edges of your pendant. (I used a paintbrush & coated two edges at a time.)
I'm sure you've got a glitter trick or two up your sleeve. But mine is basic: Fold a piece of paper in half, creasing really well. Open it up & then go glitter crazy, letting the paper catch your glitter spills. I poured out a bunch of the black glitter onto the paper & smooshed the gluey-sticky edges of the pendant into the glitter. Finish applying glitter to the remaining two edges & set aside to dry. When it's dry, tap off any excess glitter.
Now, with your paper folded in half, let the glitter glide back into the vial.
Apply two coats of Mod Podge over the whole pendant.
Attach a split ring & a ball chain.
And then wear your pendant because, honey, you're done!
Here's a peek at the backside of the pendants. Or, in the case of the rectangle pendant, the reversible side.
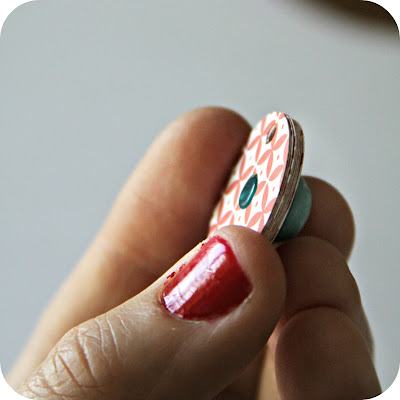
I love using vintage buttons in crafty projects. To make the round & the floral pendant, I punched out my circles, punched holes for attaching the split ring, but also punched out holes so the buttons could sit inside.
The buttons I used had shanks on the back. In order for them to sit flat, I could've cut the back of the shank off as best I could. But I wanted to created a little "well" in the papers for the button to sit inside. Plus, this gives the glue something extra to grab on to & keep the button more secure.
Gather your papers, & carefully punch them in the same spot, using a small punch for the loop in the top, & a regular school supply sized punch for where the button will rest. (To punch them in the same exact spot, just punch your first circle, & then use that as your template, stacking the next circle under it to punch.) You can see on the floral pendant that I displayed the button off to the side. Glue them together, remembering to line up the holes as you glue. (The papers with 2 holes will go on top. The papers with just one small hole will go in the back.) Apply the glitter as mentioned before, seal with Mod Podge &, lastly, adhere your button with a strong glue. I like to use E-6000.
This photo just shows how the button shank rests inside the hole-punched papers. Of course the button will be attached last, & the backside of the pendant will be finished properly, without the button holes showing.
I'm sure very few people will guess that your pendant is made entirely from paper.
And, just imagine all the possibilities with different shaped punches!
Happy crafting!
• Find EKSuccess on facebook here: http://facebook.com/EKSuccessBrands
• Find project ideas on Spotted Canary: http://www.spottedcanary.com/
Check out all the fun projects from other bloggers in this campaign!!
I wrote this post as part of a paid campaign with EKSuccess Tools and Blueprint Social. The opinions in this post are my own.
• Find project ideas on Spotted Canary: http://www.spottedcanary.com/
Check out all the fun projects from other bloggers in this campaign!!
I wrote this post as part of a paid campaign with EKSuccess Tools and Blueprint Social. The opinions in this post are my own.
♥


GREAT tutorial! I can't wait to try this. I have soooo much scrap paper. FABULOUS!
ReplyDeleteHoly Cats! I love this! I am so going to try it tomorrow! ...If I can get away with doing it then. I absolutely love this idea. Thank you so much for sharing the "how to" of it! I love, love, love it! ...Okay. I am so excited to try this. ...and, I think I'll send the page to my sisters.
ReplyDeleteps. I read that you can make mod-podge with 1/2 parts water and 1/2 parts Elmers glue. That makes the matte look. There is something else to add for the gloss look, but I don't remember what.
Anyway, thanks for the brilliant post!
I love this craft project. Thank you for sharing!
ReplyDeleteVery nice craft work! I love it... thanks for your idea
ReplyDeletewow! its looking so beautiful and you shared so amazing guide to design it.
ReplyDeleteMarble Handicrafts