Thursday, November 2, 2017

DIY: Bob Ross Trunk-or-Treat

This year my church hosted a Trunk-or-Treat. (A Trunk-or-Treat is where trick-or-treating is done from parked car to parked car, in a parking lot, usually at a school or church. Totally sounds creepy when I type it out. But it's not. I promise.) This was my first time decorating our car for a Trunk-or-Treat. My original plan was to have a pumpkin theme. Like, pumpkin everything. Orange everywhere.
But then. BUT THEN...
Pazely & I stumbled across a Bob Ross costume at a local retail store--& it was over.
Pumpkin WHAT?! Orange WHO?!
Pazely, a huge Bob Ross fan, immediately volunteered to play dress-up for our event.

The costume only included a white paint palette, a paint brush, a wig & a beard. (You could certainly save yourself some money & put this kit together piece-by-piece on your own, or even use things you might already have around your house.) The beard was quite a bit more full than shown in the picture. So I gave it a haircut. But it still wasn't right. I might have gotten a little scissor happy.
So we just painted on a beard. No biggie. Bob would've wanted it that way anyway.

We thrifted a pair of mens jeans, along with a perfect light blue long-sleeved dress shirt. A belt was borrowed from the Mr. I didn't want to spend money on ugly mens shoes she might not ever wear again. So we bought some womens moccasin slippers that she'll wear every day. They worked!  (Unfortunately, the only photo I snapped was when Pazely had a coat on. It was quite a cold evening!)
And funny thing: without the beard, Pazely could almost pull off Napoleon Dynamite. Which was bonus, because Napoleon Dynamite is ANOTHER one of Pazely's faves.


I needed something large enough to cover the opening of our trunk, so I decided to create a large "canvas". I scoured Netflix for the perfect Bob Ross painting episode. I wanted something wintery, yet warm. I found "A Copper Winter", Season 30 Episode 5, & it was perfect! 

I purchased an inexpensive white bedsheet & cut it to fit a good size for hanging in the opening of my minivan trunk. (Mine was cut to 50" x 50" & then hemmed about 1/2" on each side.)
For painting prep, I taped the bedsheet to a large piece of wood. Then I spent the next day & a half in 40 degree (F) weather painting happy trees with numb fingers & toes. Bob takes 30 minutes. THIRTY MINUTES to paint his masterpieces. You are magic, Bob. (RIP)
Bob says "There are no mistakes, only happy accidents". Well, I made a lot of those.

Acrylics on bedsheet don't blend as well as Bob's oils on canvas. But I hope I did Bob proud anyway. He is the man. He makes it look so easy. I watched the Copper Winter episode twice. And took notes. Bob makes me think I can do anything.

Pazely has claimed the painting for her own & has it currently hanging in her bedroom. Which made me super proud. How sweet! And what a compliment--especially since this was the first landscape I've ever painted.

Pazely cut out a giant palette shape from moving boxes we had lying around. The moving boxes were fairly limp, so I reinforced the back with more cardboard + duct tape. I'm Super Budget Girl, so I didn't want to purchase anything we didn't HAVE to purchase. If I did it again though, I'd use something different. I've always wanted to try using large sheets of insulation foam for prop making. So I might give that a go in the future.
We painted the palette white.
(The photo shows two palettes. We only used one because we didn't have time to get a second one put together. Plus, our space wasn't really big enough for two.)

Pazely also cut out a giant paintbrush from moving boxes. We reinforced it as well, & painted it up.

The speech bubble was cut out of foam core board. I printed out the words & traced them onto the speech bubble using carbon paper. The final step was filling in the words with a sharpie. I used a 500 size font in Freestyle Script.

Balloons were attached to the palette to resemble different colors of paint. Inside the balloons were hidden treats & prizes! Kids would walk up to a balloon & "pop" it with a real paintbrush. (The paintbrush had a pin attached to the end.)
This is where things got tricky. And looking back I'd do it differently. I originally poked holes in the palette & "threaded" the knotted portion of the balloon through, holding it in the back with a clothespin. And that worked great at first.
But things got busy & it was hard to refill the palette fast enough. So then we started clothes-pinning balloons all around the edge just to keep up with the trunk-or-treaters stopping by. Which gave me an idea: I could have adhered clothespins to the front of the palette. DUH! It would've been so much more easy-peasy to change out balloons in a jiffy! There's always next year...

We had a lot of fun & I think the kids did too! Several costumed characters kept coming back for more. Each balloon was filled with either a piece of candy (the miniature chocolate bar kind) or toys & prizes I purchased from the party aisle of Walmart. A mixture of squishy eyeballs, glow-in-the-dark lizards, bubbles, stickers, fake mustaches, coin purses, bouncy balls, silly glasses, springy slinky-type toys, noisemakers, candy bracelets, toy cars, & ink stampers were stuffed into the balloons before blowing them up.
I do miss The Dollar Tree. There are no such things as dollar stores up here in Alaska. *sigh*

Anyway, it was a simple setup. If I had more time I would've cut out paint splotch shapes from colored paper & scattered them around the car. And maybe added a real easel with a small painting on it + tubes of paint & a dropcloth...

I hope this inspires you to get creative! Bob Ross is one of our faves. The 13-year old & I had a blast putting it together. She's my little artistic buddy, so it was a theme close to our hearts.

Trunk-or-Treats are a great way to interact with your neighbors & community. It was a cold night, but we had a nice fire going outside. And inside the church we offered bounce houses for the kids + free gourmet hot cocoa. Pumpkin spice hot chocolate? Come to mama. (It was delicious!)
We had 13 vehicles participate in the Trunk-or-Treat: Hunters, Pioneers, a Mermaid Lagoon, Lego Ninjas, Spiderman, Cheerleaders, Pirates, a Magic School Bus, an Under the Sea theme, a Shark, Candyland, & the cutest family of camping lumberjacks. We're guessing about 175 kids came through. 
We can't wait to do it even bigger & better for Halloween of 2018!

Click HERE for a quick little video of our trunk in action.

(Here's Bob, warming his happy little buns by the fire.)

“Mix up a little more shadow color here, then we can put us a little shadow right in there. See how you can move things around? You have unlimited power on this canvas -- can literally, literally move mountains."
-Bob Ross

Here are 50 more Bob Ross quotes to make you smile.

Friday, May 26, 2017

DIY: Mushroom Pancake Art

Google "pancake art" & be prepared to be amazed. And mezmerized. No, seriously, time will mysteriously fly by as you gaze, like one entranced, at the soothing videos of these foodie artists doing their creative thing. I am so intrigued by this art form!
And, yesterday, on the first day of summer break, I thought I'd spend some extra time over the hot griddle to cook up some fun. I am a lover of all things fungi, so I thought I'd give a go at some mushroom flapjacks.
I have not done any research on this topic of "pancake art". I just grabbed my batter & went for it. 

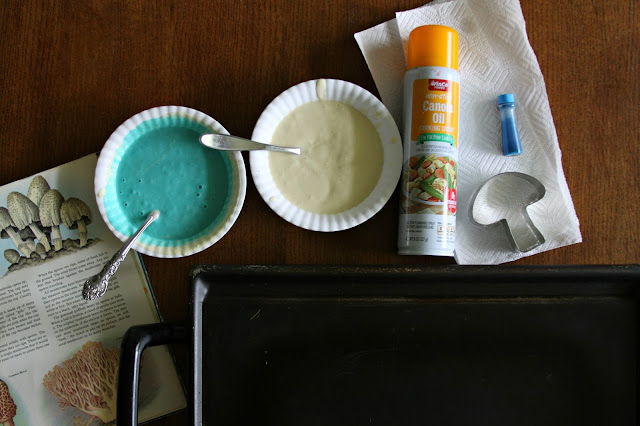
I don't have any of those fancy squeeze bottles with multiple sized tips like the pancake art pros do. But I have a bowl & a spoon. And that'll do just fine for what we're cooking up today. You'll also need: a hot griddle, cooking spray, paper towels, cookie cutter(s), your favorite pancake batter, food coloring, a spatula, & maybe a book for photo reference (or other media for picture inspiration). 

First, heat up your griddle. And while it's warming up, mix up your batter. I divided my batter into two bowls. One bowl of batter I left as is. The other bowl I colored with blue food coloring. Make it as dark or as light as you want, & use as many colors as you want.

To make things super easy on myself, I used a metal cookie cutter. This is so much less intimidating. (And cooking spray is your best friend.) Before you set your metal cookie cutter onto your hot griddle, you are going to spray the inside of  the cookie cutter with non-stick cooking spray. Spraying a paper towel first, & then wiping it on the inside of the cookie cutter works well, as does spraying your {clean & freshly washed} finger & wiping it around the inside. Each time you use your cookie cutter, you'll want to wipe it clean & respray.

Next, you'll use the regular pancake batter &, with your spoon, sprinkle dots for the mushroom top + fill in the stem. 

Now you'll use the other color to fill in the top of the mushroom. 

Let that set until the underside has cooked. (The edges will start to appear dry. That's a good hint it's done.) Carefully --it will be hot!-- use a paper towel or pot holder to lift the cookie cutter off.

Flip your mushroom pancake over to finish cooking. And that's it!

After I played around with the cookie cutter for a while, I was ready to branch out on my own.
Now, your creations don't have to be perfect. Mine were definitely not. My girls ate the pancakes no matter what they looked like. The pretty ones taste the same as the ugly ones. 
I decided to use just one color of batter, & let the cooking times change the color of the batter for me: The batter that goes on first will cook longer, so remember that. Anything that you want to be "shaded" or set apart, or darker, will need to be drizzled on first.

So, firstly, I created a stem + the little underside fringes + the polka dots on top. I let those cook for several minutes. You'll start to see them turn brown on the edges. You'll want these things to be the darkest.

Then, I filled in the little area where the underside fringe was. I let that cook for a couple more minutes.

And, finally, I filled in the top of the mushroom with a curved shape. Cook that until it's not soupy anymore & flip it over.


The more I played, the better I got. I whipped up the pink ones yesterday, & gave a second attempt with the blue pancakes today.
The girls were pretty impressed. Pazely, 12, said, "Five stars!" I'm not sure if her scale was from 1 to 10? But I'm gonna pretend it was from 1 to 5.

So, have some fun, try something new, & get ready to make a happy, pancakey mess!


Some of you have asked if I'll be doing anything on the blog this summer...

Summer is the most amazing, freeing time to wander, explore & create. Summer invigorates me! It's when I find all these random, unstructured, unoccupied moments to get creative. Although I won't be involved with anything as detailed as my past Summer Fun Diary Series or even last year's Summer School, I will be sure to share with you any interesting tidbits I find myself getting involved in.

To keep the girls & I from falling into too much of a lazy rut this summer, I have printed out copies of these "Summer Rules" I spied on Thirty Handmade Days blog. I changed the list up a little to make room for daily "Devotions/Quiet Time with Jesus". I plan on following these same rules too ---the girls were giddy about that!
I'm hoping to do a lot of adventuring here in Alaska this summer, in my own little neighborhood. I hope to have lots of fun, try new things, experience as much as I can in this new world of mine.

To catch me in real-time, be sure to follow me on Instagram!
And for a peek into my journey in Alaska, follow my other blog Nikki from Nikiski.

Saturday, May 13, 2017

Finally, the Fairy Garden!

Hello out there! Let me blow the dust off this 'ol blog & put some new happy on here!
In case you've wondered where I've been, & you're not following me on social media, & you're not subscribed to my new blog called Nikki from Nikiski, I'll tell you in one word exactly where I've been: Alaska. The fam & I moved up one week before Christmas to pastor at a church in Nikiski, on the Kenai Peninsula. And we are loving it here! 
I am busy, busy, busy, which takes me away from a lot of the fun little craftty projects I used to do, & obviously this blog. I'm {slowly} learning to divide my days into ministry days or home improvement days or Nikki days, etc. And that's helping. I am trying to intentionally pause, every once in a while, to do something fun, something that brings a smile to my face.
And this Fairy Garden project is JUST that!
If you recall, the girls & I (who will be done with school in a week & a half!!) created a bunch of items for a non-existent fairy garden last summer, during our Summer School series. We had every intention of construction beginning on our fairy neighborhood during summer break. But that didn't happen.
{Almost} one year later...
I finally gathered up a couple containers this week & decided it was time to begin building.

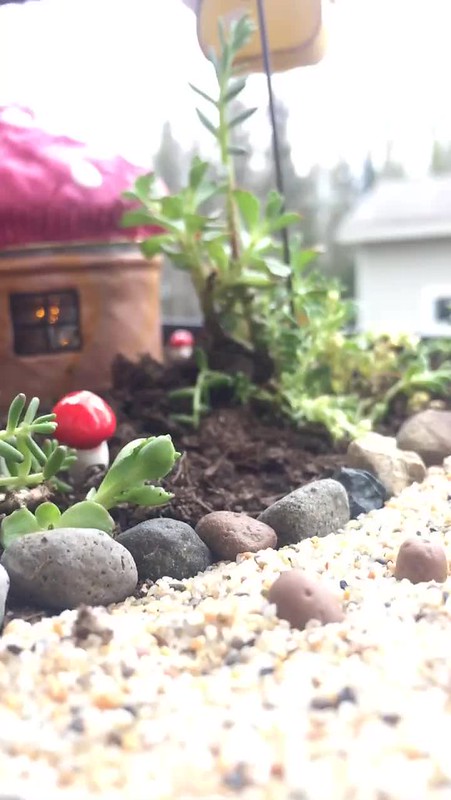
Here's a view of the garden so far. I'm telling you, this is an addictive activity. Expansions are inevitable. If you let them, these fairies will put you in the poorhouse. For reals. 
I rounded up some logs from around my yard to create little vignettes on either side of some stairs leading up to our front door. That one log covered in moss spoke to me the most. It practically yelled out to me in the wood pile. And I was like, "How long have you been sitting there? You are gorgeous. Come here, you pretty little thing." *gasp* I love me some moss. And it's, like, real moss. Not that craft store moss. 
Oh! And those flowers? It is spring, but I have YET to see any flowers growing here in Alaska. I decided I needed some color therapy, so I made a beeline for a nearby garden center. Doing happy dances down the flowered aisles. And probably causing concern in any customers in my vicinity. 
The flowers still need to be potted. I don't know where my pots are. Maybe still packed away? Did I get rid of them before I moved? I don't know. I DO know I'm afraid the neighborhood bunnies (& maybe the moose) will eat all the flowers. Hopefully the fairies have installed a good security system.

This first Fairy garden was made from a shallow drawer I've had lying around for YEARS. I once used it as a hanging shelf in Zoey's room when she was a baby. She's 14 now. 
I found an awesome square flat of sedum at Home Depot that I cut into thin strips & lined around the border of this fairy garden, like a hedge. 
(And, by the way, this post is super duper packed with pics. Like, overload. If your computer hasn't crashed by now, give yourself a high-5.)

The fairy house was made with a tin can + clay. The roof was made with foil covered in plaster paper-mache strips, then painted. Clay vines & leaves were added last.

The fairy garden guard dog was a gift. The mushrooms are from a craft store.

This sweet little guy was made by Pazely last year in 6th grade at school. It was glazed & fired.

The bistro set was purchased at Beaver Bark in Richland, WA, as were the tiny grey pebbles marking the walkway & courtyard. I lined these light grey pebbles with slightly bigger pebbles gathered from my yard. The clay book & cupcake were handmade by me. 

The tiny hedgie & hedgehog house were handmade by Pazely & I. I'm pretty sure I found the idea for the house online. There are OODLES of fairy garden tutorials online. From garden plans to DIY accessories. We used clay in a lot of our crafty projects. Clay goes a long way! 

That tire swing tho! Cutest ever. It was our first purchase toward the fairy garden. So long ago. From Beaver Bark, in Richland WA.
And those heart rocks were here at the house when we arrived. They fit in perfectly!

A twine nest (twine dipped in Mod Podge & then twisted into a nest shape) + itty bitty clay eggs.

 The base of our second Fairy Garden is a plastic rectangular container I purchased from Home Depot. It was actually the final missing piece that sparked yesterday's decision to get this thing going. We still need to complete this garden. We think maybe a picnic table in the center? Or something else garden-y? We'll be on the lookout...

 This tiny fairy house is my favorite. It's a small mason jar covered in clay. The roof comes on & off. I kept the lid, shaped a dome roof out of foil over it, covered the foil in clay, & baked it in the oven. I added a giant battery-operated tea light inside. It flickers & it is MAGIC!
Here's a quick 15-second video of the light in action while I was outside this morning listening to the birds & the quiet, enjoying some fresh air...

Early morning sounds from the Fairy Garden

 We've got bunnies in the basil. I LOVE how my fairy garden is also my herb garden.

 We HAD to purchase the green hose for our "garden" theme. I think we got it at a craft store. Also, when shopping for accessories, don't forget about the dollhouse sections at craft & hobby stores.
The watering can was from Beaver Bark, in Richland WA. The clay pots were a gift. And, look! More birdie eggs!

 Clay owl, handmade. The girls & I found a tutorial online for the acorn birdhouses. Drilling through acorns ain't no joke. Be ready to almost say cuss words. Almost.

We had tons of fun sculpting veggies for our garden. We've got potatoes, carrots, eggplant, pumpkins & lettuce. 
Because ALL the things grow at ALL the same time in fairy land!
We spread out some sand on top of the potting soil to designate our vegetable garden area, & lined it with pebbles collected from the yard.

The hanging birdhouse was a gift. So sunny & yellow! And a great addition in helping to create different levels of height throughout our garden.

I think this is pretty much my favorite spot in the fairy gardens. It sits on the opposite side of the stairs as the other fairy houses just shown. This fairy door (store-bought) is nestled among some logs. You might not notice it at first glance. I made a walkway with twigs, & planted some more of that sedum on either side of the door.
So, that's it! For ALL the pictures of our fairy garden, click HERE to view our Fairy Garden Flickr album. There are even a few tour videos in there, saved from my Instagram Stories for you to take a peek at!
I hope this inspired you to get started on your own little fairy garden!
Toodles!

Monday, November 14, 2016

Name Calling


I don't know why, but I have a hard time giving myself any sort of creative label.
If you love taking pictures, wouldn't that make you a photographer? Yes. Or if hula-hooping is your hobby, can't I call you a hula-hooper? Yes, I can. And I will.
Singing & playing the piano is a passion of mine. Yet it feels awkward to call myself a musician.

Maybe it's just me. It probably is. (I know it's not.) I can't help it. It's just some odd thing I deal with, I guess.
I live for creating. It fuels me & feeds me to be painting or drawing or writing or crafting: To be making art. I don't just live for it, I "LIVE FOR IT". (Supposed to be said with a deep growly/unintimidating monster voice.) Yet "artist" seems too grand a tag for me.
Other people have called me these names.
"She's an artist," they say. I bow my head in embarrassment. "No, I'm not," I think to myself.
"She's a photographer."
"Stop it," I silently whisper, while diverting my eyes from anyone's gaze.
"She's a writer."
"Stahpit."
Why can't I call myself these things? I don't know. We all have our own silly little personal trivial things. This is mine.
With some recent encouragement this year I stepped out of my comfort zone. I peeked from my hiding spot to publicly share my art, share my poems, share my color, share my voice.
And eventually I felt ok with calling myself "artist". Seriously, it all clicked today. Today! I was in the kitchen toasting a pumpkin bagel & suddenly I was like, "Oh my gosh. I'm an artist--& a poet. A REAL...LIVE...POET!!!!!!!!!"
And then there was some giggling & a little feet-shuffle-dance-thing going on & then my youngest daughter was like "You're a weirdo, mom." & then my bagel popped up & I had to spread the cream cheese fast because I hate eating cold toasted things...BUT, it clicked.
"Artist".
And now I can't stop saying it. I can't stop thinking it. I feel all legit &, like, with big shoulder pads on, walking around as if I own this place. Ok, not really. The shoulder pads are outta here...
Sometimes it takes time to realize who you are, to be ok with seeing yourself in the positive way others see you, to let the name calling really sink in.
I'm thankful for the process. I'm thankful for all the times I've been called those names in the past because it took that many times of hearing it to equal believing it.

Monday, August 22, 2016

Summer School: Week 10 (The finale)

This was our last week of Summer School! It is SO much fun to look back at all we did. Be sure to visit all of our posts in the 2016 Summer School series HERE. To see all our pictures from this year's Summer School adventures, click HERE.


MAKE SOMETHING MONDAY
It was all about the jam-making. I had an AWFUL experience of buying $30 worth of raspberries at the local Farmer's Market & then discovering the next day they were FILLED with worms. Fruit fly larvae, to be exact. G-R-O-S-S! I cried so hard. Making jam is connected to memories of my grandmother. So I was a mess. *sigh* But the next day a sweet friend gifted me with some non-worm-filled raspberries! I now have lovely jars of jam to enjoy through the winter. And I'm a happy girl.


TIME TO READ TUESDAY
Currently reading...
Pazely: The Diary of Anne Frank
Zoey: Harry Potter & The Cursed Child *Parts 1 & 2*
Me: On Grief & Grieving by Elisabeth Kubler-Ross, M.D. & David Kessler


WHAT'S COOKIN' WEDNESDAY
I can't get enough of that raspberry jam. I made thumbprint jam cookies. The girls ate them. Except Pazely. She ate around the jam part. Haha! I've never made these kind of cookies before. I know they're usually seen around the holidays. But I was craving them now. 

After I baked them I saw this recipe for Peanut Butter & Jelly Thumbprint cookies. Wish I would have seen this before! So fun! 


THINKING THURSDAY
I've been seeing these exploding watermelons on the internet & wanted to give it a try.
HERE is a video of our experience. I was afraid. (Haha!)

SOMEWHERE FUN FRIDAY
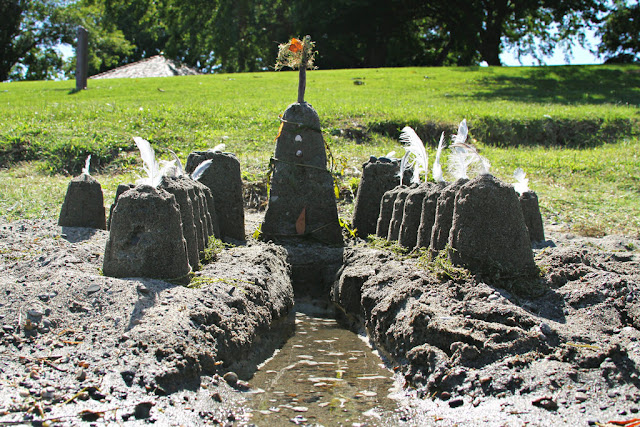
The girls & I had a picnic (Wendy's 4 for $4 in the car at the Howard Amon Park parking lot. To avoid the seagulls.) + we chilled at the river & a made a sandcastle. We celebrated the ending of a fun-filled summer!

I'm really glad I tried something new this summer. Less stressful, & feeling more productive than in past summers. Overall, we enjoyed the experience. 
Pazely's top 3 faves were:
1. Making milkshakes
2. Visiting the giant Adirondack chair
3. Making the cinnamon roll waffles
Zoey's top 3 faves were:
1. Going to the outdoor movie in the park
2. Making milkshakes
3. A picnic with her mom
My top 3 faves were:
1. Toe painting
2. Giant cardboard postcards
3. All the fairy garden crafts

Though we set a routine for our weeks this summer, I realized that I ended up losing my own personal routine. I can only do so much. So, needless to say, I am looking forward to school starting next week! Woohoo!