

I had a few people ask about the labels I made so I thought I'd give a quick tute. Jeanetta from Splendid Things shared her "secret" with me & I'll share it with you.
You'll need to purchase some transfer paper specific to the style of printer you'll be using. (I've got an inkjet.) I found my paper at JoAnne's fabric store. It was hanging with all the quilty tools & stuff. Read the instructions on how to load it into your printer, etc. And REMEMBER to print the mirror image of your design. I still make mistakes on that one.
 Again, follow the directions about iron settings & such before ironing the image onto your fabric. I used muslin or plain colored cotton. I put a piece of white typing paper on top of the image before I ironed because my iron is a bit....um....messy.

 Again, follow the directions about iron settings & such before ironing the image onto your fabric. I used muslin or plain colored cotton. I put a piece of white typing paper on top of the image before I ironed because my iron is a bit....um....messy.
When cooled, peel off paper backing.

From here you can make your labels whatever style you wish. To make labels like mine, cut out strips of fabric that are a little larger on all sides than your muslin, using pinking shears.


From here you can make your labels whatever style you wish. To make labels like mine, cut out strips of fabric that are a little larger on all sides than your muslin, using pinking shears.


Machine stitch along the edges. I like using a haphazard-like stitch.

Now your labels are complete, ready to be sewn onto your handmade goodies.
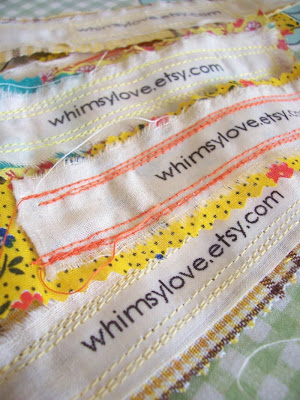


Now your labels are complete, ready to be sewn onto your handmade goodies.

Here's what Jeanetta's labels look like. These were stitched onto a sweet cupcake she made me.


That's it! Hope this helps!

I love your labels! And I really want that cupcake!
ReplyDeletethey're really cool. I like how they're all individual and can be made to match the items they're going on.
ReplyDeleteCute labels! How do you get your computer to write it backward?
ReplyDeleteWhat a generous spirit to share that!
ReplyDeletewow what a great idea thank you for sharing.
ReplyDeleteIf you like fabric I am having a giveaway from an etsy shop called fabric supplies it ends on Sunday. you are welcome to enter.
Super cool labels!
ReplyDeleteLove it.
Thanks for sharing.
IfatArt
You have the CUTEST tutes! I love your labels, they're fabulous!!! I'll be linking, thanks so much for sharing this!
ReplyDeleteThank you so much for sharing! I can't wait to try this!
ReplyDeleteOh I love this. Thank you for sharing. I wanted labels for stuff I make but didn't want to have to order them all the time. This is a great way to add an additional personal touch. Love your labels. :-)
ReplyDeleteThank you so much for sharing! I probably have everything on hand and should be making them right now!
ReplyDeleteGreat tutorial! Well done!
Hi Wendy!
ReplyDeleteOk, I have NOTHING on my computer when it comes to cool publishing or graphics programs. All I have is Microsoft Works Word Processor & PAINT. Once I create the wording I click the "Image" tab & just flip/rotate my image "horizontal". From there I copy & paste it into each rectangle on a label form & then print it out.
I know, I really need to upgrade.
That's awesome!! Thank you SO much for sharing!!!
ReplyDeleteThis is an adorable idea. Thanks for sharing.
ReplyDeleteNerissa
This is great, thank you!
ReplyDeletei love it! thanks!
ReplyDeleteBravo! I'm off to get some printable fabric stuff-thanks for sharing!
ReplyDeletethat is just a brilliant idea :) Loving it a lot
ReplyDelete