Showing posts with label how to. Show all posts

Friday, July 16, 2010

Crafty Fun: Anklets!

 Supplies:
stretchy jewelry cord
super glue
beads
scissors

Measure your ankle & cut that amount of cord PLUS a few extra inches for tying off the ends.
 Now, string on your beads. I find it much easier to work on a piece of felt. The beads don't roll around. Once you're sure you've got the correct amount of beads strung, tie a knot. (Pull nice & tight. You don't want any saggy beads floating around.) Then dab the knot with super glue. I tie off two more times & dab with another dollop of glue. Just to be extra super-duper sure it won't come undone. Then cut off the excess cord.
Done!
(And of course this same process applies for bracelets!)
 
This was the project I taught at the Crafty Night this month. 
 I've been obsessed with making them for the past few days. Gosh, stringing things is so relaxing & enjoyable.
Zoey models the sweet anklet I made for her---complete with a tiny butterfly charm.
Her ankles are so much cuter than mine. 


Yay for fun summer gifties for friends!

Wednesday, September 2, 2009

Paper Doll Birthday Invitations!

I'm so excited to be getting started planning Zoey's upcoming 7th birthday party. She chose a "paper doll" theme. The invitations, which I had to whip up rather quickly, came out quite lovely & I really adore them. Here's how I made them...
I like to give the flavor of the party in the invitation. I'm hoping this one will have a sweet, simple & old fashioned feel. I scoured the internet for vintage birthday invitations & read the sayings until I found one I liked. I just copied & printed that onto the blank notecards I had, along with all the party info. I usually make up my own little message inside, but I like the rhyme-y, sweet, innocent sayings inside those old cards.
I used blank cards cards that were 4 1/4" x 5 1/2". I found scrapbook paper in the colors that I'm planning on using at the party: yellow & pink. I cut rectangular shapes in 3" x 4" size & rounded the corners with my decorative scallop-edge scissors. (Nifty trick huh?!)
I used a couple tiny bits of double stick tape to hold the paper in place while I stitched around the edges on my sewing machine with a bright yellow thread.
After I printed out all the information I realized that I forgot to mention on my invite WHO the party was for. So, I snuck a little "Happy 7th birthday Zoey!" in tiny font on the back of the card.
I've spent the last couple nights cutting out paper dolls & paper doll outfits. And I'll be cutting out LOTS more before the party day arrives. I used vintage Betsy McCall paper dolls. You can find them HERE. I could sit for hours & gaze at all the lovely paper doll clothes. Crafty yumminess! I'd like one of each, please.
I printed them onto sticker paper so I could easily & quickly get my invitations done. But gluing would work just as well. I plan on using those images for LOTS of accessories & decor at the party!
To seal the envelopes, I cut out the sweet little paper dolls & stuck them right on the back.

This will be Zoey's first "friends" party. Usually it's just been mostly family: aunts, uncles, grandparents, a few cousins & maybe some friends. But now that she's getting older she has become more social & made more friends--in & out of school. So, I'm excited for her to have a festive day of her own with a bunch of squealing girls!
Oh, & thanks for your ideas for old-fashioned games & crafts. Keep 'em coming!

To view the party, click HERE!

Wednesday, August 19, 2009

Whimsical Fairy Doors Tutorial

The girls & I just finished a 2-day project & we're so excited to share it with you! I recently found these Fairy Doors on Flickr & immediately fell in love. Ann Arbor, MI even has tours of secretly hidden fairy doors scattered around the city!
First, I cut some rounded door shapes, with a jigsaw, from a leftover piece of wainscoting/bead board. Any type of wood will work though as long as it's not too thick.
We spray painted the doors. House paint or exterior paint would work too.
Earlier in the summer we collected all sorts of fallen twigs, pine cones & acorns, etc to use for this project. We covered a table with newspaper & set out the twigs-n-stuff, along with acrylic paints, brushes, water bowls & paper towels.
You can leave your twigs natural, but we decided to add a bit of whimsy & paint them bright colors.

When your twigs are dry, you can adhere them to the door. First we played around with the design, getting the sticks to lay however we chose. Then, we applied floor & wall adhesive (the same stuff you use to lay tile floors) to our twigs & mushed it into place. I would've opted first to use my E6000 glue or even wood glue, but both those things are hard for my girls to use & I liked the spreadable texture of the floor adhesive. It is a bit stinky, so use ventilation or do this project outdoors. Wearing gloves is a good idea too.
I told the girls to really glop it on--so that it would stick. I really like the look of the adhesive oozing through the branches too. I suppose you could clean it up as you go along if that's not your style.
We constructed extra accessories for our fairy door with clay. (Fimo or Sculpey). I made some door hinges ...
...a mushroom doorknob & a "window". The window is just a small piece of round mirror I had. The girls used lids from the frosting of cinnamon roll tubes I saved. We just made snake-like shapes, wrapped it around the "window" & baked it in the oven just like that. I also added some leaves 'cause I thought mine looked a bit twiggish.
Zoey's door (my almost 7 year old):
Find a sweet little place to prop (or attach) your fairy door.
The fairies & pixies will know your kindness & hospitality when they see your magical & whimsical creations!
Here's my finished door:

Pazely's door (my 5 year old):

Monday, August 17, 2009

Extra Bug Catcher Necklace Post!


Zoey wanted in on the bug catcher action, so today she made this!
These necklaces could also hold tiny treasures.
See tutorial HERE.


Sunday, August 16, 2009

Bug Catcher Necklace Tutorial

**THIS PROJECT WAS FEATURED IN THE 2012 JUNE/JULY ISSUE OF FAMILY FUN MAGAZINE!!**
My 5 year old LOVES bugs. Any living creature gets her sweet heart humming really. Today she found a lady bug at church & had to hold it in her hand all the way home. All of a sudden I thought of those little plastic cases that house the 25cent gumball-style treats. And how cute it would be to have one of those around to hold bugs in. When we got home, I told Pazely my idea & she mentioned she wanted a necklace--so, we got to work right away! What fun we had creating our own bug catcher necklace!
The supplies: beading cord, scissors, beads, a small vending machine plastic capsule, a thumbtack & (eventually) a bug!
*The capsules I used were some that the girls had lying around. But here is a link for some really cute ones at Tiny Things are Cute. They're a bit different than mine, so I'm not sure if they'd "click" together like mine did & hold the bugs securely. The price is right though!
*UPDATE: Caryn, of Tiny Things are Cute, has informed me that, though the capsules in her shop will hold bugs, she does not think they will work for securely "clicking" & being used as a bug catcher pendant on this necklace project. Just an FYI. (I must find another project for those capsules of hers, because they're just so darn cute!)
First you'll want to poke little holes all over the lid of the capsule. And poke a larger hole right in the middle.

Thread one end of your beading cord through the large hole.

Now hold it around your neck & measure how long you'd like your necklace to be. Remember to leave about 1 1/2" at each end for knotting off the necklace.

String beads onto the cord.

When the beads are all strung, push the other end of the cord through the hole. I had to push it through with the tack.
Slide one more bead onto both pieces of cord & knot it a couple times to secure.

Insert bug, & you're done! We put a tiny snack of lettuce inside too.

Remember to not leave your bug in the catcher too long. Eventually let your buggy pet go free!
To see Zoey's necklace, click HERE.
Not so crafty-natured? Let US make YOU some Bug Catcher Necklaces! Click HERE! (And we thank you from the bottom of our buggy-lovin' hearts!)

Tuesday, August 4, 2009

Campfire Roasted Cinnamon Rolls

We ate these one morning while camping last weekend. And I give credit for the idea to my friend Tia.
To make them, you need a tube of cinnamon rolls, sticks & a campfire.

Just an FYI: When Tia & I made these, she had purchased the Pillsbury brand & found that they did not come in a "spiral" shape like the cheap brand I purchased did. They both still worked, but it's easier if the dough is already in the "spiral" form.

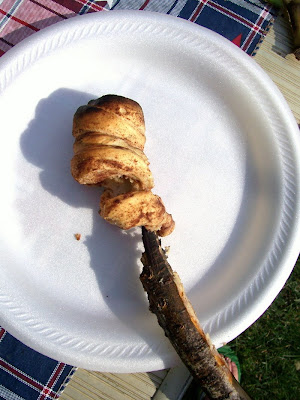
Twist the dough around the top of your stick.

Pinch the ends to prevent the cinnamon treat from falling off the stick during roasting.
Roast over a fire, just like you would a marshmallow. Hot coals are best---not a flaming fire. You'll have to be patient, because they don't cook up as fast as a marshmallow. So, keep watching it until the outside is golden & the inside is cooked.
When it's done & lookin' tasty, slide the cinnamon roll off the stick.

Cover with frosting & munch away!

Or, you can get all savage & eat it right off the stick. haha!
(You can also do the same thing with the tubes of biscuits or dinner rolls.)