Showing posts with label food. Show all posts

Sunday, December 14, 2014

DIY: Cone + Cookie Tree

I bought a treat for myself one day. Pirouette cookies from Pepperidge Farm. I love those things, & it had been YEARS since I had any. A quiet moment away, all by myself, with a cup of hot tea + a pirouette is a perfect escape for me.  
I decided how unfortunate it was that my girls had never eaten these cookies before. I resolved it was time to share an extra special snack with them, so I retrieved two cookies from my secret stash in the first set of kitchen cupboards on the left, above the Keurig, middle shelf, right-hand side, behind all the mugs. The girls gobbled the cookies down. Like animals. They went ga-ga over these chocolate-filled rolled wafers. Like obsessive little sugar monsters, demanding more, moRE, MORE! 
My secret stash was soon made public. The gig was up. Crikey!

I just want my own cookie-filled tin. I don't want to share anymore. 
mine, miNE, MINE!

*deep cleansing breath*

So, um, yeah, this project. One day my kids were eating MY cookies *wimpers* + some plain ice cream cones (I know: weirdos) when all of a sudden the 12-year old declared, "It's a tree, mom!" Thus a project in the Crazy Crafty Christmas Countdown was born. (Zoey wanted to make sure she got proper credit.) 
Not only are these super quick to make, but my girls thought it was fun to create edible art. Especially Pazely. 
*Note to self: buy more sprinkles.* 

Here are the supplies you'll need to make your own...


If you're doing this with kids, you might want to stick the cookie to the graham cracker on your own, ahead of time. The chocolate takes about 20-30 minutes to set up well before you can add the cone. And little ones might not be patient enough to wait.


Keep these as decorations, or eat them as a snack!


The Crazy Crafty Christmas Countdown is a D.I.Y. project every day from Black Friday through Christmas Eve.
So be sure to check back often!
Click HERE (or the logo on the sidebar) for a list of all the current Crazy Crafty Christmas Countdown posts.

Tuesday, June 17, 2014

Making Pretzels

Before summer break began, I started putting together a bucket list of summer fun activities. Pretzel-making was at the top of the list. It's one of those things I've wanted to try for a while, & something I thought the girls would enjoy too. And since our outing to watch a bird banding demonstration this morning fell through, (we looked & looked at the park, but couldn't find the event), we made a detour for the grocery store to pick up the ingredients for plan B. Plus, the weather sort of turned gloomy & it just felt like the perfect activity for such a time. 
The recipe we used to make the pretzels can be found HERE

We practiced our pretzel-twisting skillz with some wet yarn & playdough.
There are tons of videos on how to shape a pretzel on YouTube. We found THIS link to be helpful. (And it was short: 16 seconds. I don't need a 9 minute video to tell me how to shape a pretzel! Seriously.)
And then the edible fun began...


My first attempt at placing a twisted pretzel in boiling baking soda water was HORRIBLE. I tried to repurpose the soggy dough into pretzel bites. Thus, the little bits that look like bloated + mangled fried fingers.
Pazely made a mini pretzel from her dough & it turned out really well! I'm thinking when we make these again, to divide the dough into more than 8 pieces, so we have more of a snack-size pretzel.

I also made 3 different dipping sauces. The first was just some leftover whipped chocolate ganache frosting, (If I didn't have the frosting on-hand, I would have made a powdered sugar glaze.), the second was simply honey mixed with a squirt of mustard, & the third involved following THIS recipe for the Saucy Sister's Oktoberfest Pretzel Dipping Sauce. It's like a cheesy mustard sauce. Next time I make it, I think I would use less mustard + more cheese. 

The girls loved the pretzels. In fact, it was our lunch. Pazely & her friend loved the chocolate sauce best, while Zoey preferred the honey mustard. The Mr. slightly coughed when he sampled the mustard/cheese sauce. Too much mustard?
These were easy to make, & fun to involve the kids.
Yay for baking adventures!


Thursday, September 5, 2013

great eats

I've recently had some success in the kitchen trying out some delicious new meals & I thought I'd share...

This Quick Chicken Teriyaki from Kraft really is super quick to cook up. It uses Minute Rice, & when you're in a hurry, there's nothing better than a food with "minute" in its name.

• 

The Mr. was craving some Thai food, so I got a little excited when I spotted this slow cooker Thai Peanut Chicken recipe on Pinterest. (I heart my crockpot!!) Before heading to church one Sunday morning, I tossed all the ingredients into the crockpot & it was ready 4-5 hours later! Not a totally healthy dish with all that peanut butter, but oh-so-yummy anyway. I opted to serve it over chow mein noodles. Next time, as per suggestions I read in the recipe's comments, I would add the veggies towards the end of cooking + kick it up in temperature with some ground red pepper.

• 

I recently had a lovely tea & fancy brekkie with my sister, mom & grandmother. I brought a new breakfast casserole dish to share. One that I'd never made before. Don't you love willing guinea pigs? (Who don't necessarily know they're guinea pigs...)
First of all, this dish was EASY to put together: the Canadian bacon, English muffins, & eggs sit together in a bowl overnight.
Secondly, the Hollandaise sauce is out of this world. (I'm keeping the sauce recipe on file for life.)
Thirdly, the ladies couldn't stop raving about it. Even my dad & the Mr. crashed the tea party to have a slice.
(I cut the recipe in half--a serving for 6--& cooked it in a round Corning Ware 1.6 litre dish. The dish was 3" deep & 7.5" in diameter. It was perfection.)

• 

And lastly, don't let this Slim Potato Casserole fool you. Now, I've made some super cheesy fattening hashbrown dishes in my day. And I was a bit skeptical that this particular skinny casserole wouldn't satisfy. But I was pleasantly surprised at how lip smacking it was! It was a hit with the whole fam. The recipe uses greek yogurt, milk & water, instead of the creamy canned soups & heavy sour cream. A healthy & delightful option!

You want to know how superbly delicious I think all these recipes were? I didn't even snap one picture of them. They got eaten up so fast I didn't have time. No time for an Instagram foodie photo?!?! That's some appetizing proof right there.

And, please, feel free to share your favorite dishes, with links, in the comments!
I could always use help making up my weekly menu plan...

Saturday, January 28, 2012

Biscuits & Gravy

For the last few Saturday mornings I've been making big breakfasts before the fam heads off to Zoey's basketball game. (I'd love to cook big brekkie's every Saturday, but it just doesn't always happen.)
This morning was a first: biscuits & gravy. I know, I know: "WHAT?!"
I'm just not a fan of this meal.
I dislike sausage, which is all I ever see in a traditional 'biscuits & gravy'.
So, I found a recipe to replace the sausage with bacon!
SO AMAZING!!!
I didn't have a chance to get the gravy photographed.
(Hungry guests consumed it very quickly!)
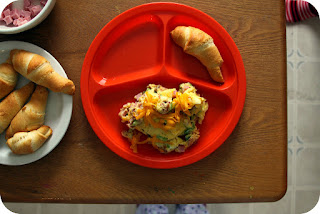
The picture up top is of the leftover biscuits.
I used THIS recipe as a starting point.
I used a whole package of bacon & doubled up on the flour & milk.

Sunday, December 25, 2011

Christmas Breakfast

 I first learned about "breakfast in a bag" in the summer of 2008, at a MOPS (Mothers of PreSchoolers) retreat.
The post can be found HERE.
Basically, it's an omelet in a bag, & it has become a Christmas breakfast tradition ever since.

Gather up your eggs, toppings & freezer bags (specifically marked with each breakfast patron's name in permanent marker).
Crack open your eggs into the bags. (We usually do 2-3 eggs per bag.) More eggs means longer cooking time. Then, toss in your desired toppings. Pre-cooked bacon, pre-cooked ham cubes, cheese, onions, green peppers, olives, mushrooms, tomatoes, etc.

 Seal the bag shut & then squish it all around to mix it up.

 Toss the bags into a large pot of boiling water.
(Make sure the bags are SPECIFIC freezer bags. They are stronger & can handle the boiling water.)
Cook anywhere between 8-15 minutes.
I usually {carefully} remove the bags from the boiling water & use a wooden spoon to smush around the plastic bag & all its ingredients inside & then toss it back in to cook some more. (I do this a few times during the cooking process to guarantee all the eggs have been thoroughly cooked.)
 When the omelet has fully cooked, simply toss it onto a plate, sprinkle with more cheese, salt & pepper (if desired) & munch away!! No mess to clean up!!


Tuesday, November 17, 2009

Tuesday, August 4, 2009

Campfire Roasted Cinnamon Rolls

We ate these one morning while camping last weekend. And I give credit for the idea to my friend Tia.
To make them, you need a tube of cinnamon rolls, sticks & a campfire.

Just an FYI: When Tia & I made these, she had purchased the Pillsbury brand & found that they did not come in a "spiral" shape like the cheap brand I purchased did. They both still worked, but it's easier if the dough is already in the "spiral" form.

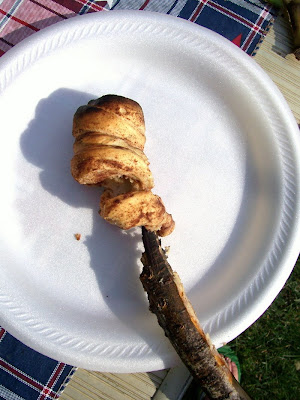
Twist the dough around the top of your stick.

Pinch the ends to prevent the cinnamon treat from falling off the stick during roasting.
Roast over a fire, just like you would a marshmallow. Hot coals are best---not a flaming fire. You'll have to be patient, because they don't cook up as fast as a marshmallow. So, keep watching it until the outside is golden & the inside is cooked.
When it's done & lookin' tasty, slide the cinnamon roll off the stick.

Cover with frosting & munch away!

Or, you can get all savage & eat it right off the stick. haha!
(You can also do the same thing with the tubes of biscuits or dinner rolls.)

Sunday, July 12, 2009

Silly Sandwich Toothpicks

Last night I decided to fix some BLT's for din-din. (Ok, they were BLAT's. I added avocado.) While the bacon was sizzling I had a fun idea! I love getting those fancy fringed sandwich toothpicks when I order up a tasty sammie at a restaurant or deli. (It's the simple things that make me giddy.) So, I decided to make up my own version of them.
My old-school Dymo label maker was all I needed! Make 2 labels & stick 'em back-to-back, with the toothpick in-between. If you don't have a label maker in your crafty stash, you can create a similar look by simply stamping letters/words onto circle dot stickers. Again, adhere 2 stickers back-to-back.
Here are a couple other versions I came up with:
Garage sale stickers.


Tiny stars made from a mini punch. A little dab of glue is all you need.
My girls loved these on their sandwiches!
You can totally personalize these for baby showers, weddings, birthdays, etc.
I really could have gone crazy making silly sandwich toothpicks. But I found out that doing this during the prime hours of tummy grumbling is not such a good idea.


Friday, August 17, 2007

Bonding While Baking...

I have been anxious to show off the day of cupcake baking I had with my girls on Wednesday. My hubby didn't get it. He was baffled at our cupcake party plans. He thinks there has to be a REASON you bake cupcakes, like a holiday or birthday or some other celebration. NOT AT ALL!! Any day is a cupcake day in my book! (And it always helps if you have a box mix!)


And what makes crafting & baking even MORE fun?? Making messes along the way!
"You've got a glob of frosting stuck in your hair? Who cares--we'll chisel it out tonight!"....."You dropped a load of batter on the carpet? That's OK! Leave it there!--It's easier to pick up when it's hard & chunky anyway!"....."Sprinkles all over the floor? Cool! It looks WAY better that way!!"


Confetti cake mix rocked the house. And chocolate, pastel pink, white & soft blue were the choice of frostings. We decided our fun would be in honor of Pazely's two front teeth, who were about to see the end of their days. (Her surgery went awesome! Thanks everyone for your thoughts & well-wishes! Hi Olivia! Pazely says "Fank-you!".......OH, & random funny story in the middle of my cupcake party blog: After Pazely had her two front teeth removed, Zoey came home & saw her little sister for the first time since Pazely got home from the hospital. They were sitting at the dining table together & Zoey said, "I don't think I will play with Pazely too much. I don't want to catch what she has!")


I had to steal a picture of "Bowl Licker Pazely" at the end of our long line of cupcake-batter-filled tins awaiting their friend "the oven". I even bought a brand new 24-mini muffin tin for the occasion. I've never owned a mini tin! YAY! Presents for Nikki!


And here are the lovely cupcakes! We had so much fun using all our new sprinkles, picks & embellishments I've received from my last two (& only two) cupcake swaps! We packaged up several cupcakes in a box & brought them to a neighboring family. Another box went to the mechanics at my family's auto shop. You gotta share the cupcake love!

Cupcakes rule.....ya dig?