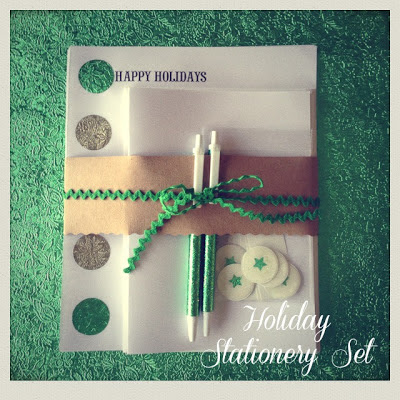
♫It's beginning to look a lot like Mod Podge Christmas!♫
I'm a lover of snail mail & I adore Christmas, so when I received a box of Mod Podge & Plaid (makers of Mod Podge) products to play with, I decided to create this Holiday Stationery Set. The set includes:
5 notecards, 5 envelopes, 10 pieces of writing paper, 5 address labels, 5 envelope seals & 2 fancy pens.
And, I admit, I originally spelled "stationery" wrong in that first photo. I had to go back & edit my mistake. Is it "a"? Is it "e"? I can never remember. Here's a trick: Let the "e" remind you of "envelope".
There. Done. Never making that mistake again.
I also love a good ole crafty makeover.
Sit tight while I transform this stark white bit of sadness into....
...THIS lovely collection of correspondence paraphernalia!
Sha-zam!
I chose the color scheme of green & silver, coordinating everything around that.
Supplies:
•Blank envelopes
•Blank writing paper (I used plain computer paper)
•Blank notecards
•Blank mailing label stickers
•Ugly pens (more about that later)
•Scraps of gift wrap or scrapbooking paper
•Mod Podge (in matte or regular or glossy--doesn't matter)
•Sparkly Mod Podge or Plaid Folk Art Extreme Glitter in Confetti
•Mod Podge Rub-On Transfers
•Plaid Folk Art acrylic paint in Holly Leaf (green)
•Plaid Folk Art metallic acrylic paint in Aluminum (silver)
•Mod Podge Dimensional Magic with silvery glitter (not pictured)
•2 foam brushes
•Small paintbrush
•1" circle paper punch
•Holiday stencils
NOTECARDS & ENVELOPES:
I chose 5 different stencil designs for each of the 5 notecards, but you could definitely choose just one design.
Use your green acrylic paint + the foam brushes to stencil onto your cards. When stenciling, don't use a LOT of paint, or you'll have a goopy mess all over your cards. Lightly apply the paint until you get the intensity of coverage you desire.
When the paint is dry, apply Sparkly Mod Podge to all or some of the painted areas.
While you're at it, embellish the corner of each of the 5 envelopes, using paint & stencils.
**After this project was all done, I realized that including 10 envelopes would make more sense. Which means, you'd need to make 5 more mailing label stickers + 5 more envelope seals also.
WRITING PAPER:
Cut your paper to size, using the envelopes as a guideline. I like to make the paper wide enough to fit in the envelope, & long enough to have to fold in half only once when mailing. Punch out circles from your gift wrap & apply to the edge of the paper using Mod Podge. I had this fantastic vintage green & silver foil in my stash.
The Mod Podge Rub-on Transfers are AWESOME! They are filled with words & phrases having to do with TONS of holidays. I picked out my favorite Christmas-y words & applied a different one to the top of each piece of writing paper. (5 pieces of writing paper were left blank + 5 pieces were embellished with all the goodies, for a total of 10 pages of writing paper in the set.)
MAILING LABELS:
Apply the smaller sized rub-ons to mailing label stickers.
ENVELOPE SEALS:
These were my favorite part of the stationery set. I played off the whole "wax seal" concept & created stickers to adhere to the back of the envelopes when mailing.
Punch out 1" circles from the mailing label stickers. I punched out mini stars in the green foil & glued them down in the middle of the stickers using Mod Podge. Then, apply the silvery glitter Dimensional Magic over the whole circle. These have to dry for several hours. The Dimensional Magic dries clear. (The picture below shows the seals "cloudy", due to the fact that the product is still very wet.)
FANCY PENS:
Our church has tons of promotional pens, so I used a couple of them for this next project.
When I applied the 2 coats of Mod Podge to the pens (in step 4) I used Sparkly Mod Podge to give the pen a bit more pizzazz.
(I originally had pencils in the stationery set mix, but I nixed that idea - thinking the paper & Mod Podge might destroy the pencil sharpener.)
(I originally had pencils in the stationery set mix, but I nixed that idea - thinking the paper & Mod Podge might destroy the pencil sharpener.)
And there you go...holiday snail mail happiness!
Wrap it up & give it as a gift (you could even include some holiday postage stamps), or keep it & write your own sentiments to family & friends.
To keep up-to-date on all types of Plaid crafty goodness, find them on Facebook, Twitter, & Pinterest.
I wrote this post as part of a paid campaign with Mod Podge, Plaid and Blueprint Social. The opinions in this post are my own.
More Mod Podge inspired holiday projects can be found here:


Those are gorgeous and so sparkly!
ReplyDeleteThese are FABULOUS!!!!!!!! Bravo terrific work! Adore them, they remind me of Martha Stewart's line!
ReplyDeleteThese are AWESOME. It looks like these were professionally made!
ReplyDeleteSo pretty! I really love the envelope seals!
ReplyDeleteWOW! You made that plain white paper (and ugly pens!) dazzle and shine! There's a lot there for me to experiment with--thanks for sharing!
ReplyDeleteSo simple and gorgeous! Aaaand, you are A/G?? Me too.
ReplyDeleteThanks Heather! Yep, A/G! My Mr. is an A/G pastor.
Delete