Showing posts with label organization. Show all posts

Tuesday, June 21, 2016

Summer Fun Schedule

The girls & I have begun our second week of summer break. And, if you've been keeping up with our goings-on over on Instagram & Facebook, you'll know that I have gotten super organized this year. The last two years were a doozy of disappointment. I had no energy to coral the littles (who, I know, are not technically little at almost 12 + nearly 14) away from their electronics. I was tired of being their maid. And the girls looked back & felt like they had wasted a potentially fun summer. Which they did. We all did. 
So this summer, things are a-changin'. I browsed Pinterest for inspiration, & I found several weekly schedules with catchy themes for each day. I loved that idea, so I printed out my own version. (Using Picmonkey & importing it into Word.)

Every weekend I plan the next week's activities. And on Monday morning, I display my organized work of art next to the fridge. The girls have requested that I hide each day's theme, so they'll be surprised when they take turns revealing our project or venture of the day. There's an anticipation & excitement. So far, one week + one day in, the girls LOVE it! This might be too organized for some--it's not for everyone. But I needed guidance. And this plan gives me just enough of a general theme to run with it & personalize it. And, really, some of the day's items only take minutes. Others can linger for however long we wish to hang out with them.

The girls also have a small checklist of items they HAVE to do every day. It's so I can combat bedhead & fuzzy teeth all week long. You understand. But it also includes reading, several minutes of writing + math, morning devotions with Jesus, & a minor chore or two. It hasn't killed them to have responsibility. In fact, my youngest wakes up before anyone else in the morning & gets her checklist done lickety-split. And then she naps after lunch because she's so tired from waking up so early. Haha!

Zoey noted that it appears we are homeschooling. It definitely does look that way. Which is why I jokingly call it "Summer School". But remember what I said earlier? The girls LOVE it! And I'm having so much fun planning our weeks. And here is what each week looks like (some of them are self explanatory):
MONDAY = Make Something Monday 
TUESDAY = Time to Read Tuesday (this simply means "go to the library")
WEDNESDAY = What's Cookin' Wednesday 
THURSDAY = Thinking Thursday (whatever we are curious about, we will research that, or do a S.T.E.M. themed project: Science Technology Engineering Math)
FRIDAY = Somewhere Fun Friday (as many free &/or cheap local places I can come up with!)

Ok, so this schedule I created is as plain & boring as can be. But I thought I'd make it available to print your own anyway. (Click the "pop-out" icon in the top right corner for an option to print.) You can jazz it up with markers & whatnot. 


I'll be posting a weekly recap of our Summer Fun Schedule shenanigans, so stay tuned! Hopefully it will inspire you. (Maybe it'll also help me get back into this blogging game.) 

I'm adding our Summer School 2016 photos to an album, so you can always pop over HERE to take a peeksie at all our Monday through Friday Summer School adventures.

Happy summer, friends!

To view all posts in our 2016 Summer School series, follow along HERE.

Tuesday, January 27, 2009

Organizing on Paper.

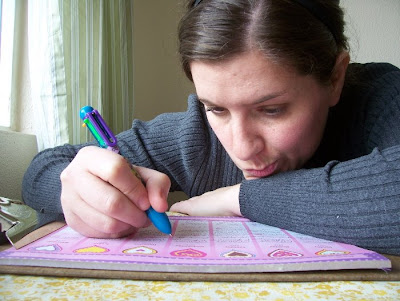
One thing I did last week was to get my brain really wrapped around the idea of organization. More specifically, organizing my days on a weekly planner. I have realized, about myself, that I like to play a lot. I like to have loads of silly fun. And that, sometimes, makes for a not-so organized girl. I've made lists before. Planned out my week in a sorta haphazardly way. But this time, I got VERY specific for each time slot of the day. I need that. This week is my first go at trying this out. We'll see how it goes. I sure know that not everything works for everybody when it comes to organizing & planning. I'm just trying to find out what works for me. (*I found the fill-in-the-blank heart weekly planner at The Dollar Tree a couple years ago.)

To begin, I used a pencil to get everything squeezed into each day. I knew the things I HAD to make time for every week: the girls school, prepping orders to be shipped, etc.

I knew the things I WANTED to make time for every week: making stuff, blogging, taking pictures, etc.

And, I knew the things that sometimes slack every week, but that I wanted to make a priority: making dinner EVERY night (instead of frozen items half the week), a thorough house cleaning once a week, etc.

And all those 'to-do's' got penciled in & erased & shifted around & penciled in again until I felt it was gonna work for me. And then I used a pen to make it a "reality". And it was sooooo interesting to see a typical week from that angle, to see a different viewpoint of the days events. I could see where I had little pockets of time open. I could see where "the weekly plan" was going to help keep me from making things for hours & hours when I really should be doing other stuff. When it was all written out, I felt SO GOOD & so confident & ready to tackle each week & get things done & check things off my list every day.
Here's one example: I could see that every Tuesday & Thursday, after dropping the girls at school, I wanted to make "going to the gym" a priority. It got written down on my weekly planner. Then, after working out, I realized that I have about an hour of time leftover until I had to pick the girls up from school. I usually head home to shower & tinker around for that hour. But instead, I'm going to NOT go home, but use my time wisely & go grocery shopping, drop packages off at the post office or run other errands. Grocery shopping is miserable for the girls, & unless my errands include anything with the word "toy" in them, they could care less. I actually save so much time running errands when the girls are NOT with me. And after I pick the girls up from I school, I can drive home, hop in the shower, beaming with productive pride that the errands have already been done & decide what's on the agenda next: Old Maid or Crazy 8's?
P.S. Sorry so late in the day with this post. I was busy following my weekly plan. HAHA!


I must add one final note. This may seem like a list of duties to be done at precise & exact times, but what I'm doing is giving myself some guidelines throughout the day & what will end up happening is I'll be creating MORE time for myself to do the things I really enjoy doing.

Friday, September 26, 2008

Accordion Envelope Book Tutorial

I taught my MOPS group how to make these a couple years ago & thought I'd give a tutorial. I learned how to make them from Paper Source. The first one I made kept things inside like receipts, to-do lists/grocery lists, coupons, & stamps. I made this red & brown one as a portable shipping book--to keep my packaging goodies handy when orders go out: stamps, labels, biz cards, stickers & notes.


Here are the supplies you'll need...

-envelopes (you can make your book however big or small you want. The one I'll be showing today uses 5 envelopes.)
-scissors
-glue stick
-razor
-ribbon
-scrap papers
-pencil


The first thing you'll want to do is put glue on the flap of 4 out of the 5 envelopes...
...& glue them to the front side of each other. The flap of the first envelope will not be glued. It will become the front cover of your book.


Here's a different view.


After they're all glued you'll fold them, accordion style, back-n-forth to form a book.


I decorated the front flap with some scrapbook paper. Trace around the flap onto the paper...


...& cut it out.


Use some decorative scissors to cut the straight edge & make it a bit more interesting.


Open your book all the way & measure the very last envelope to find the center point on both sides.
Cut a small slice through the envelope, on each side, just large enough for your ribbon to slide through.


You'll have to reach inside your envelope to slice the side where the bottom of the last envelope lays. It's easier this way.


Now slide your ribbon through both slots. When your book is closed, your ribbon will tie everything closed nicely.


Now decorate little tags or labels for each envelope. You can use your computer printer, stamps, your own handwriting, etc.


Here's a close-up view of each envelope in this book:


This one uses large 5 1/2" x 8 1/2" envelopes & it was made with only 3 envelopes. It's a kit to help you stay organized for a party. The first envelope holds the invitations/thank you notes, the second envelope holds address labels, & the 3rd holds pre-printed templates to keep track of RSVP's & your "Party To-Do Lists".


You can use whatever size or color of envelopes you want. This one was made using small 3 1/2" x 4 1/2" envelopes. It was created to keep track of memories. (Stay tuned on October 1st for Kara's Virtual Baby Shower & I'll show you what's inside!)


These are super quick & easy to make & you can accommodate them to fit any theme you'd like! They make fun little gifts!

Wednesday, October 10, 2007

Nik's Crafty Space

I know I've photographed my art studio before--in fact, I think I gave you a full-on view of my messy space quite a few months ago. I'm so excited at showing you my dry-eraseboard! (boring, I know...just smile & pretend you're interested.) I thought I'd give you a close-up look at some other organizational items in my studio that have helped me in the past to stay SOMEWHAT organized. I'm needing more help, but these little babies have helped to carry me this far...
YAY! My new pink whiteboard! It's a nice large size for my tiny wee studio-- 3' x 4'.

This is a really cute box I have hanging on the wall. I painted it up in a nice deep salmon color, added a cute vintage knob & added a really pretty shabby rose detail to the top. The tiny drawer is even lined in a really cute shabby paper! This box much holds all my packing supplies & things: tape, labels, biz cards, freebies, etc. It's pretty much empty now because all those things I just mentioned are scattered somewhere in "WhiMSy love" world. It'll get better. I'll get there. I promise.
I have always seen these wall hanging hook things at antique stores. I really don't know what they are for, but I stumbled upon one at a garage sale last year. They are hung REALLY high so curious little peoples will not get hurt. I hang my pretty hangers on them--awaiting a new home from someone special.
I got this 2' x 3' bulletin board at a thrift store for just a buck or two. I covered it in some material, painted the border a distressed white, & glued a bajillion vintage buttons all around. I use it as my "inspiration" board--tacking up bits & pieces of things & stuff that I love. I've made the tacks from vintage buttons as well. In fact, I sell similar tacks at WhiMSy love!
I found this shelf at another thrift shop. I painted it my favorite color of vintage green. It sits on top of my studio desk. And, the picture sucks, but I lined the back of each shelf with pages of a vintage book---the book is about filing & organizing! This shelf is great for all those little items I use frequently & might need in an immediate instance.
I saved my favorite organizing doo-dad for the end. I'm sure it's not a new idea, but I had never seen it before. I am ALWAYS seeing those vintage record holder stand thingies at thrift stores. So, I bought a couple & now I use them to organize & store my magazines. I am a magazine junkie, if you didn't know that. The thicker mags don't work for this, but I also have a vintage pattern holder that sits on the floor & I house some mags there too.


And guess what I found yesterday? I was at Rite-Aid getting some cough meds for the wee ones & I stumbled upon some different colors of dry erase markers!! I think the colors are a bit odd.

BUT, I did a google search & look what I found!!! I'm in dry erase marker heaven. 16 colored markers? Are you kidding me? I definitely had to order them. There's even a "pink" one! I mean, come on!--if that's not a sure sign to buy them, then I don't know what is...

Tuesday, October 9, 2007

Apple Crisp-a-licious

Well, the apple crisp went over OK at my mommy's group this morning. There wasn't a whole lot of time to do it, so the rush just kinda ruined the fun of it. But, here's my yummy apple crisp anyway! Between my cinnamon rolls baking this morning & the apple crisp in the oven this afternoon, my house smelled WONDERFUL!!!!


And, here's the recipe--as I did get a request from a certain British blog buddy. (**waves to Kara!**) I didn't have orange juice to add to the apples, so I added about 1/4 CUP of apple juice instead. BUT, when it was all baked up, the apple crisp was FULL of juicy liquids on the bottom. Too much, in my opinion. So, next time I wouldn't even add any juice.
I did a LOT of math when gathering all the ingredients. The bulk bin at the grocery store made for tremendous savings!!
At the meeting I had all the ingredients separated into different boxes for each table, including: cutting boards, knives & measuring cups/spoons. Once cut up, the apples were placed in a large freezer-type bag & the yummy crumbly topping was kept in a small ziploc bag. The moms each went home with their 2 baggies PLUS the recipe card. They could choose to toss it in a pan & bake it when they got home, or store it in the freezer for future baking.

Tonight the hubby & I are going to hang my new large dry-erase board. It's taken me so long to put the dang thing up because I wanted to paint it. And guess what color it is? PINK! 'Fairytale Pink' to be exact. I love spray paint. And like I've said in a previous post, I'm hoping this is just the beginning to my organization hassles. It is important to me to make even the mundane things in my art studio (file cabinet/bulletin board/dry erase board/shelving/etc) be exciting & interesting & artsy as well. I'll have to take pics of some of those "mundane" things for you in a later post.

And this is weird, but I'm gonna google around to find some cool colored dry-erase/white board markers. Do you think they make 'em in colors other than drab red/green/blue & black? I sure hope so. I'll let you know what I find.