Showing posts with label cupcake. Show all posts

Thursday, April 2, 2009

Clay.

With my no-clay-knowledge know-how I sat down & had some fun pretending like I knew what I was doing with this slightly squishy stuff. The fact is, I had no idea what I was doing. But here's another fact: I had TONS of fun! I'm working on an upcoming project for my MOPS group (Mothers Of PreSchoolers). Guess what we'll be making? Terrariums!! I was immensely inspired by Made by Mavis & those oh-so-cute ceramic mushrooms by mudpuppy. I have temporarily stepped into the world of miniature gardens & wee clay creations.
As you can see, I've thumbed my way through making some mushrooms, a faceless gnome (I was too afraid to add a face & make it look all scary) & other whimsy-like clay creations. I'm quite pleased & terribly excited about sharing this project with all the other moms at the meeting! They'll each get to choose a clay figure to add to their tiny enclosed handmade green world. (The gnome is mine. Hands off.)
Unfortunately the baking time takes too long for the moms to make their own little clay creatures at our meeting.
As I gather supplies & make a sample terrarium, I'll be sure & share pics with you.

Oh, & speaking of clay...I was asked to be a part of the Big Button Challenge by Lisa of Polka Dot Cottage! Lisa is quite the clay mistress. Her work is AMAZING! Her buttons are like candy. I've never been a part of any crafty challenge so I'm very happy to do this! I received my button in the mail yesterday. I love the pinks & greens & stripes & that's why I chose it. (I think my old vintage buttons are jealous of this new shiny handmade button.) Now, I have to come up with a clever creation for my button. I will reveal all in due time...

Tuesday, February 10, 2009

A Cupcake Post

Lookie what I got today! I didn't even have to make them. I won them in a raffle at my MOPS group (Mothers of PreSchoolers). The girls squealed when they saw them. And then we ate them. Well, not ALL of them. But most of them.
For my self portrait today, as part of my 365 Days, I chose this photo. I'm multi-talented. I can talk on the phone (I was talking to Mr. WhiMSy love), take a self portrait AND eat a cupcake--all at the same time! (What you don't see is that I'm playing the piano with my toes.)


Look at this adorable cupcake calendar I just got from my friend Tia! There is a different recipe for EACH day of the year! Isn't it sweet? I think I will be making cupcakes more often in 2009. (Tia's already hinted at sampling any baking that comes as a result from these recipes.)


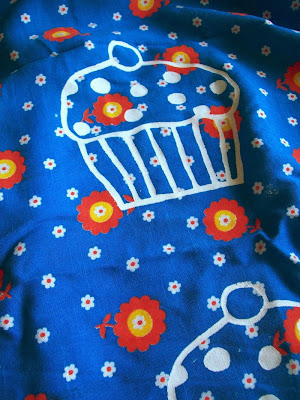
I finally got out my cupcake screen & did some screenprinting on some of my most favoritest (I know that's not a word) vintage fabric. I'm going to make these into little cupcake pillows. They'll be about 9" tall. I'm so excited to play with a new project!

Check out my bloggy pal's post about her Valentine 'box-o-chocolates' mini cupcakes!

Ok, I better scram. The girls & I are going to have some fun Valentine crafty time! (We're making shrinky dink key rings & paper owlie valentines.)

Sunday, November 2, 2008

Thrifting & Surprises for Me!


My mom & I, who are close pals, took a little 45 minute road trip to Hermiston & Stanfield Oregon yesterday. I was on a mission for forks. We stopped at a few antique & junk shops & found some interesting things....


Here's a scary doll head from the 1970's.


And a sweet little suitcase. My mom had a suitcase very similar to this when she was little. She remembers packing it up & running away from home.


I literally rolled out of bed & hopped in my mom's car for our trip. That's why I look so.......un-sassy. But, I'm still rockin' it with a random pink guitar I found at one of the stops along the way. No, I didn't buy it.


I was so excited to find these toys! I remember them when I was a kid. They're giant Tinker Toys. I can totally remember me & all my cousins gathered at grandma's house on Guemes Island playing with these one Christmas. And of course, being a wee kid, these things seemed ENORMOUSLY HUGE to me!!! Unfortunately the price wasn't so right to purchase them.


The shop I finally found my forks at also housed a sweet bunny named "Bun Bun"...


...& some little birdies.


Forks. SCORE!


More shakers for my vintage button bouquets.


The towns we were in are not that big, & our GPS had trouble finding "Points Of Interest". I had to take a pic because I thought that was so funny. Still, we managed to find our way around.

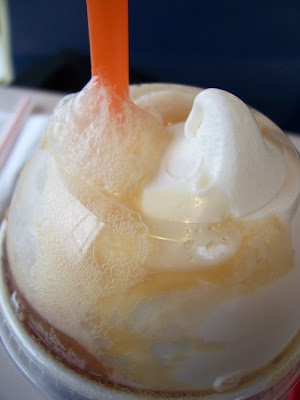
We ended the day with a root beer float. Num.
A big surprise awaited me when I returned from thrifting! I received a package from a contest I recently won over at whosies blog. Look at the handcrafted cupcake goodness that is ALL MINE! There's an apron, a small tote, 4 napkin holders, a dishtowel & a hot pad/pot holder. It's from Whosies and Whatknots.


***Owlie Holiday Ornament & Sweet Holiday Card now available in the shop!
Have a happy Sunday! (I'll be cuddling on the couch with some fuzzy socks, a warm blanket & a hot cup of something delicious. I'm feeling achy & blah!)

Sunday, October 19, 2008

Tacky Canvas Bag Turned "FaBuLoUs" Tutorial!

This bag is one of those “freebies” or “promos” you get when you join some gyms, sign up for an account at some banks, or become a member of any number of organizations. They’re everywhere! At least, I see them everywhere. They’re plain, usually natural canvas. And when I get them, they get tossed in a heap somewhere-- never to be used again. It doesn’t really appeal to me to walk around advertising the logo or brand name of some random business. SO, that’s where this tutorial comes in. I’m gonna take that "tacky" bag & alter the crap out of it. Well, at least we’ll embellish the front with some cutesy stuff. You could transform this bag multitudes of ways. The following tutorial is just one idea. I use this technique on LOTS of items. You’ll see later on.

The first thing you’ll do is find yourself a bag. Thrift stores seem to have an abundance. Or ask your friends for theirs. If you’re desperate, find out what organization is giving these suckers away & sign up for whatever they’re offering JUST so you can get a bag!!
Think of a design you’d like to create. I’m rather fond of cupcakes. And owls. So, that’s what I used. Think of a simple design.
Now trace your design onto some iron-on adhesive.
There are different kinds of iron-on adhesive & I’m pretty sure the directions are different on some of them. I used Therm O Web Heat-n-Bond brand in ultra hold. I used “ultra hold” because the material I’m using is pretty thick & I want it to stick REALLY well--especially since this item will be tossed around, used a lot & washed on occasion. The directions I give in this tutorial will be referring to this specific brand. Please refer to the manufacturer's instructions on how to use whatever iron-on adhesive you choose to use.


Here's a great tip for tracing your design. Well, first of all, you could make a template from heavy paper or cardboard. I like to "eyeball" things. So, here's my tip: Place a large piece of the iron-on adhesive right on top of your canvas bag. The adhesive is thin enough to see through. That way, when you're tracing, you know if your design will cover any logos or wording.
After you trace your design, cut around your markings, leaving a bit of space along the edge.
If your design has a few different parts to it, trace those parts on separate pieces of iron-on adhesive. For example, my owl’s body will be one piece, the 2 wings, & 2 eyes will be 4 more pieces & the beak will be the final piece.
Next, you’ll want to find fabric for each piece. I love using vintage fabrics, but use whatever you have, or scour the thrift stores or bargain bins at fabric stores. Even clothes or sheets in cool prints will work! One tip: You’ll be covering up the words & designs on your canvas bag with these fabrics. Use a medium to darker colored fabric, or a thick fabric, so that the words will not show through. (On my cupcake designed bag you can slightly see the image hidden underneath.)


Place the iron-on adhesive, smooth side UP, onto the WRONG side of your fabric. Iron should be set on dry, silk setting. NO STEAM. Using the instructions that come with the adhesive, fuse the two together.
After the piece has cooled down, cut it out.
Peel off the paper backing. (My girls love helping with this part.)


You'll now have a shiny surface left on the back of your fabric pieces.


Lay your design out on the canvas bag. When you get your design placed in the desired position, iron them onto the canvas bag, following the instructions that came with the adhesive.
Your bag is pretty much done! I say “pretty much”, because you can actually add buttons or decorative stitching if you’d like. While stitching, you may need to call upon the help of friend "thimble" because the adhesive, combined with the heavy canvas bag & fabrics, are quite difficult to sew through.
I showed you a simplified version of decorating---but feel free to go wild my crafty friend! Slap on some rik-rak, ribbon, tulle & trim!
After washing, slight fraying may occur around the edges of your fabric. But that'll just add to the charm of your design.Now tote your hip-n-stylish bag around town & actually USE it!! I know I will!
Oh! Before I forget, I have to tell you something Mr. 'WhiMSy love' said. I was explaining to him about this tutorial I was working on. He was like, "Just turn the bag inside out." I guess that's another option I didn't consider. Thanks honey. (**sarcasm**)

I use this iron-on adhesive paper for many of the projects I make & sell. Here's some more WhiMSy love items, made using my favorite iron-on adhesive...

Mini Cupcake Notebooks


Wee Onesie with Skullie

"Wee Tees" with Owlie

Tuesday, August 5, 2008

New Stuff!

I'm excited to show off some new stuff at 'WhiMSy love'! I've made these onesies for my friends & family for a while now & so I thought I'd pop a few in the shop & see how they do. This Cutie Cupcake Onesie set is perfect for twins or baby best friends forever! I made some for my new twin nieces & it got the BIGGEST reaction at the baby shower. Cool gift!---SCORE!!

I've got cupcakes & skullies in the shop now. Check out the new section called Wee WhiMSy love! I've got owlies coming soon!

I've also added a listing for a VINTAGE BUTTON RING OF THE MONTH CLUB. It's for a 6 month subscription & I think it's just a neato idea. You get a new ring around the first of the month all dolled up in a sweet paper box & ready for gifting or hoarding. I can also create 3, 9, or 12 month subsriptions too!


Sunday, August 3, 2008

A Celebration Fit for a Cheesecake Cupcake

This past week was my little bro's birthday. The fam had another wonderful fun day at the river. I packed the essentials: beachie floatie toys.


With knee brace on, I sat back & enjoyed the sights & sounds of a summer fun day.

I made my brother his favorite dessert--cheesecake!! I made two cheesecakes, but realized I only had one pan to make them in. So, I improvised. I made cheesecake cupcakes!! I had no idea if it would work or not, but I was PLEASANTLY & SCRUMPTIOUSLY surprised when it did!!! I'm unashamed to say that my most favorite cheesecake is from a box--JELLO brand. MMmm. Delish. The graham cracker crust mix in the box only filled up 7 of the cupcake tins. I just pressed the crumbs (mixed with the butter & sugar, of course) around the bottom & up the sides (a little over halfway up the sides). I then filled the cups with the cheesecake filling & then I froze them for about an hour & a half. The leftover cheesecake filling was added to the other cheesecake in the pie pan, to make for a huge-mongous piled-high treat.

Once the cheesecake cupcakes were pretty firm, I cut around the edges--one at a time & then turned the cupcake tin upside down to "catch" the falling cupcake carefully in my hand. The cupcakes were stuck inside my non-stick cupcake tins, so cutting them out one at a time was important. I was surprised at how well they stayed together!I topped them with cherries at the scene of the birthday & they got eaten up lickety-split. The kidlets in the party group enjoyed theirs topped with spinning pinwheels.


Who knew that less than 12 hours later I'd be in the hospital with the wee one? She is doing well now. Pale yet spunky. Thanks to everyone for your prayers & kind words. It meant more to me than you'll ever know that my invisible friends in blogland were so supportive.


Pazely's face lit up when she received a peanut butter & jelly sandwich at the hospital--her first "solid" food & her favorite thing in the whole world--after having a week & a half of a liquid/soft food diet.

And although I'm not getting a whole lot of sleep--I am enjoying watching the late, late, late crafty shows that I never get to watch since I'm usually sleeping when they're on. So, while I'm worried-ly "sleeping" on the couch & watching over the wee one (alert & responsive at every sound she makes), I'm getting a crafty education as well.

Hope you had a nice weekend!