Showing posts with label summer fun ideas. Show all posts

Friday, May 24, 2013

Ant Tracking

It is a gloomy, overcast day outside—perfect for ant tracking!
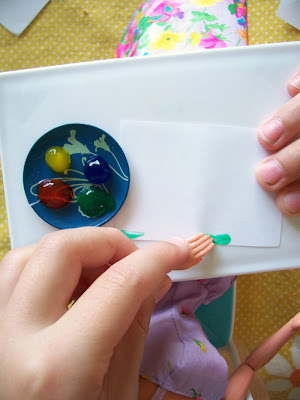
I can't remember where, but I read about ant tracking some time ago & thought it'd be a fun thing for the girls to do this summer. We grabbed several different colors of acrylic paint, some tweezers, tiny paint brushes, & a magnifying glass. 
We sprinkled bread crumbs near the anthills. Once we spied an ant trying to carry his meal away, we found it easiest to pick up the food with the tweezers & paint the ant this way. A magnifying glass will help to see better. If one person holds the tweezers while the second person paints + holds the magnifying glass, it works great. Zoey helped me film this 6-second Vine showing how we painted the ants. In fact, I ended up using a teeny tiny pine needle instead of a paint brush, which worked great!


On some ants we just painted the bums, on other ants we dotted the bum + the head. Once you've painted several ants, grab your magnifying glass & start observing! Just be careful not to burn the little guys---which is why a gloomy day works best.

The girls marked the anthills with sidewalk chalk. This is "my zone" & that is "your zone". 
I could hear Pazely squeal: "Hey Zoey! My ant just went to your ants house!"
And then I could hear Zoey say, "Well, it's still my ant. It's not your ant."
*oh brother*

This is actually a real true thing that researchers do. 
Watch THIS cool video to check it out. 
It's really quite neat!

Monday, August 24, 2009

Window Writing


Last weekend the girls & I had some fun decorating the outside of our house windows. Just because. We used a window marker, which we got at Walmart in the party section. But on my last visit, I saw all sorts of colors in the crafty section.
This would be a fun way to spell out "Happy Birthday" if you're having a party. I'm even thinking of surprising the girls when they wake up on their first day of school with some fun messages to celebrate their BIG day!
Here is a cupcake I drew along with this phrase: "Happy As a Cupcake!"
The marker washes off very easily with a hose.
I even attacked our tiny bathroom window, which sits above the bathtub. To remind the bathers of their duties you know.
And then Zoey drew some guy riding a horse & farting. (I didn't even bother to ask. I blame her dad.)

Monday, July 6, 2009

Cream Puff Tower


I came up with this last-minute dessert idea for an impromptu birthday celebration my family had for my visiting 17-year-old nephew. I melted chocolate chips in the microwave & dipped the very bottoms of cream puffs into the gooey chocolatey goodness & arranged them in a towering shape on a large platter. (The chocolate is like a "glue", keeping the cream puffs from falling all over the place.) Once they were stacked, I drizzled some more chocolate all over.

It was SUPER easy & SUPER fun to make!! You could even use white chocolate chips colored with food coloring. Or add chopped/diced pecans or other nuts to the melted chocolate before drizzling all over.

The cream puffs were found in the freezer section of my grocery store. This dessert would make a cool treat for any hot summer day!


Wednesday, July 1, 2009

Newspaper Hats

More newspaper headgear today!

I have always wanted to learn how to make these newspaper soldier hats. Yesterday I finally made one. And I'm so shocked at how easy it was!

Simply take a full sheet of newspaper & lay it in front of you, just like in this picture:

Now take the two sides & fold them until they meet the middle & form a point:

Fold one of the long rectangle flaps up & crease:

Flip the hat over & fold up the remaining flap. That's it!

Although, when I originally folded mine, the hat seemed HUGE & looked funny to me! (See photo below.)
So, I folded the brim up one more time. Perfect fit!

After learning this basic hat fold, I also learned how to make several other hats from the book "50 Ways To Have Fun With Old Newspapers" by Bill Severn, 1978.

Academic Mortar Board, Bishop's Miter/Royal Crown, Bullfighter's Hat, Jester's Cap, Printer's Hat, Military Cap.
Fireman/Fisherman's Hat, Pirate/Admiral/Napoleon Hat, Mexican Sombrero, Sunshade Hat

Fold on crafters!

Tuesday, June 30, 2009

Newspaper Crowns

After being inspired by the bounty of children's crafty books I recently borrowed from the library, this is the first project I attempted. Today is Pazely's REAL birthday, & I thought it only appropriate we make some party crowns.

The project simply calls for newspaper. That's it. BUT, the girls & I painted a watercolor wash over ours to make things a bit more schnazzy. You can do your painting before the crown is cut out, or after.

Crease your paper as seen in the picture. The folds should be at the top & left side. Measure 6 inches in...


...& cut all the way up.

Now lay your paper flat so you'll have a doubled piece of newspaper, approximately 22" long x 6" tall, with a fold at the bottom. Fold that in half, from short end to short end. Keep folding the paper this way until you end up with a folded bunch that's about 1 1/2" across.

Measure 2" down & you'll be cutting from that mark diagonally across. See the shaded area? That will be chopped off.


Like so. You can also create a rounded corner by arching your diagonal line.


Right under that 2" mark, you can cut out a design if you like. Half a heart, half a star, half a diamond or circle, etc. Once you cut it & open it up, the whole design will be revealed.
Like so.


Now wrap the crown aruond your child's head (or your head) & staple in the appropriate spot to hold the crown in place. (Don't staple it TO the head though.)


You can decorate with gems & jewels if you want.


Then let the royal riot begin!


The star one would look cute painted red, white & blue for the 4th of July!


P.S. Oh, the book I learned this from is called "50 Ways To Have Fun With Old Newspapers" by Bill Severn

P.P.S. Happy Birthday Pazely!!

Summer Fun Craftin'!

The girls & I made a trip to the library yesterday. We got so many books & videos I could barely carry my super duper JUMBO bag out the door. And, the dork that I am, I weighed them when we got home. 27 pounds of library goodies! I borrowed so many books about kiddie crafts--I can't wait for some summer fun craftin' with my girls! I had to take a picture from one of the books & show you. The "supplies" list cracked me up: a nail...electrical tape...a graham cracker. You know, the usual crafty supplies.

I'm gearing up to show you lots of fun & simple projects to fill these wonderfully lazy days of summer!

So, stay tuned!

Friday, June 26, 2009

Playdough!

Yesterday Pazely asked me to make playdough. And so I gladly came to her rescue. (Thanks to the cream of tartar that happened to be in the ole cupboard---waaaay in the back of the cupboard.)
I forgot how easy it was to make playdough. It seriously took about 5 minutes.

Dump in all these ingredients over medium heat:
1 CUP warm water
1 CUP flour
2 teaspoons cream of tartar
1/4 CUP salt
1 teaspoon oil
food coloring
Stir, stir, stir...& very quickly the soupy mess turns to the lovely consistency known as "playdough".

(The girls & I separated the dough into 3 small balls & then added our colors---smooshing with our hands until it was all kneaded into the dough.)
Here's a link to a recipe I used. There are 8 different playdough recipes listed. The one we tried was the "Traditional Playdough". Zoey is eager to make the edible Peanut Butter Playdough.

Thursday, June 18, 2009

Watercolor & Contact Paper ART

The girls & I had some summer crafty fun after reading about this project over at Blissful Kids.
It was the perfect kid craft: simple.

Wednesday, June 17, 2009

Tiny Art

So, Zoey--my 6 year old--came up with this silly idea.
But you know what?
It was nice that I got a break from having to come up with ALL the summer entertainment.
At least for a second.
Besides, Barbie's got some mad finger painting skills.

Tuesday, June 9, 2009

Elephant Toothpaste


Here is a fun experiment you'll have to try this summer. It's called Elephant Toothpaste.


DO NOT EAT IT!!
Of course, when I yelled out "Elephant toothpaste fight!!!!!!", the experiment rose to a whole 'nother lever. (I do not recommend this portion of the experiment for little ones.)


OH! And here is a fun video to watch. Have you ever dropped a Mentos into Diet Coke?
Click HERE.

Happy experimenting!!