Showing posts with label vintage. Show all posts

Wednesday, April 22, 2009

I bought WHAT?

I ♥ thrift shopping. It's one of my favorite pastimes. At least once a week, I make it a point to thrift. I love the treasure hunt. I love the deals. I love digging & searching. I love making up stories as to WHY someone would get rid of something or WHO it belonged to or WHAT value some person in the past held to the item I had found.
I often come home with some odd collection of random finds. And last week was no exception.
I am immediately drawn to anything with a vintage feel or aged appeal. So, when I saw this vintage golden yellow rose peeking out from under a pile of doilies made in China, I grabbed it right away. Oooh! Look at that black tulle & the sparkly gold & green rik-rak!! What a cute apron!! I took it home & carefully looked it over as I do all my thrifted loot.
(Hmmm...)
This "apron" had also come with a miniature table runner. Or something resembling a miniature table runner. I was a bit puzzled.
(These apron strings are a bit too small. Please don't tell me a human actually exists that could wear this thing! Wait. These strings don't cinch the same as an apron might.)
The shape of the apron was a tad bit odd too.

2 DAYS LATER.....

(Oh. Hold it. Hold on a sec here. I think I know EXACTLY what it is....)

Yep. Perfect fit.
Mystery solved. And though it's everything vintage & cute & lovely & adorable, I just can't keep it in a house with 2 little messy girls & a man.
So, these pretties for your potty are in the shop now!

Thursday, January 29, 2009

Thrifty Games Galore


Whenever I shop at thrift stores, I am always drawn to the games, puzzles, crafty bits, fabric, lamps, linens & old books. Oh yeah, & forks. I usually don't look at much else. Yesterday I totally scored at the thrift store. If I ever purchase games or puzzles, they're usually taped up & sealed shut. So, I never know what I'm bringing home. For an inexpensive price, I don't mind. If lots of parts are missing, I figure I can always use the leftovers for something creative & crafty-like. It's always a win-win ya know? It's never a waste.


I LOVE this "Original" Memory game from the 80's. My girls & I played it right away. All 72 cards were there! YAY! My favorite cards are the owlies, the yellow birdie & the strawberry.


Another 80's find was this Bugs Bunny & Taz puzzle. Yep. All 100+ pieces accounted for.


This next game HAS to be one of the most odd pieces I've ever scored. It's an adult drinking game from the 60's!! (It's for sale in the shop!) ((UPDATE: SOLD!)) Players travel around the gameboard taking drinks as instructed. The object of the game is to recite & collect 10 'Pink Elephant' cards. What's on those 'Pink Elephant' cards? Why, tongue twisters of course! Try saying "I stood on the steps of Burgesses Fish Sauce Shop, mimicking him hiccuping & welcoming him in." Or: "A cup of proper coffee in a copper coffee cup." If you mess up, you gotta take a drink & try again. The little game pieces are tiny whistles--that really work!


I think all our favorite games & puzzles are the good & old ones that we've collected along our thrifting travels. So, what things get your attention while browsing thrifty goodies?

Saturday, January 24, 2009

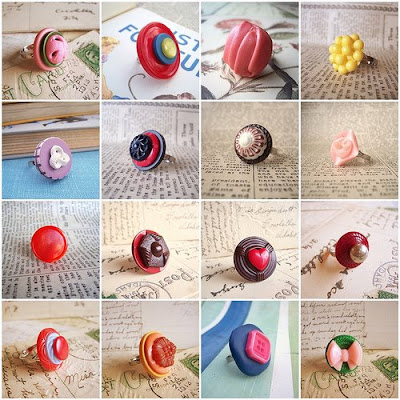
RANDOM RING SALE!

I need to make room in the shop for some new rings, & so, I thought I'd have a Random Ring Sale----& even include the new arrivals in the sale! YAY! Visit the 'Funk-o-Licious Jewelry' section of WhiMSy love to choose your favorite lovelies! Sale good through Jan 31st! (Prices already marked.)

(Newer rings arriving randomly throughout the sale!)

*You can also click on the picture to be taken to Vintage Button Ring Land.

Happy Weekend!!

Wednesday, January 7, 2009

Goodies for Me. Goodies for You.


Yesterday was my first day back to having a few hours of mommy time in the morning. After dropping BOTH girls off at school & working out with my pally wally Tia, I scooted off to my favorite antique mall. I'm looking for newspapers to resurrect THIS ITEM into the shop. (They'll be a bit different, with their petals made from vintage newspapers instead of current periodicals.) After not finding what I was looking for, you better believe I didn't leave empty handed. Oh, sweet vintage fabrics, lovely trims & old buttons....you are my weakness...
Did you see what else is in the shop again this year---just in time for Valentines Day? THIS CARD.
And because I'm such a big fan of that lovely holiday, I'm having a giveaway!! Stay tuned for tomorrow's blog post!

Sunday, November 23, 2008

Luggage Tag Tutorial

I learned of the idea of this project from one of my MOPS buddies Julie. (**Hi Jules!!**) This luggage tag would make a GREAT quick holiday gift for the traveler in your family. You can even take this basic concept & make awesome fabric gift tags.

Supplies: The supply list seems long for such a small crafty project, but don't let that intimidate you. You know I only do simple, easy & fabulous tutes! First on the list is to gather different fabrics &/or felts. You'll also need a plain light-colored fabric for the "I.D." part of the tag. I've just recycled an old flour sack for that part.

You'll also need scissors, (optional: decorative zig-zag scissors), iron-on adhesive, an iron, embroidery threads, needles, grommets & a grommet setting tool


Another optional item is some transfer paper.

The first thing you'll do is cut the front piece of fabric for your tag AND a piece of iron-on adhesive a hair-bit smaller. Iron these together following the directions on the package.

The next step I didn't photograph very well. You'll want to decorate the front of your tag now. I cut out some pieces of felt in the shape of hearts & sewed the green & yellow heart together. Then, I stitched them onto the front piece of fabric with a simple running stitch using orange thread.
Once that is done, you'll want to lay this piece aside & work on your back fabric piece. I took a piece of green felt to use as my back piece. Take a piece of your plain light-colored fabric, cut just a little bit smaller than the back fabric piece & stitch it on in a haphazard way to the felt.
Now you'll want to sandwich your front & back pieces together & iron them -once again following the directions that came with your iron-on adhesive. I laid a piece of fabric over my design before ironing so I wouldn't scorch or ruin the felt heart design.


Use your decorative scissors to trim the tag to desired size.

Now for the grommets! Once you learn how to use a grommet you're going to want to do this technique on EVERYTHING! Make a small hole at the top of your tag. There are two parts of the grommets: One part is just a flat disc--kinda shaped like a flattened donut---sometimes referred to as the "female" piece, & the other grommet has a part stickin' out--sometimes referred to as the "male" piece. Put the "male" part of the eyelet/grommet into the hole you just made, through the top of the fabric.


Turn the tag over & slide the donut shaped piece onto the part sticking up. (Rounded part up.)

The grommet kit also comes with a little heavy circular piece. Rest the front part of the grommet (the "male" piece) into the grooves of this heavy circular piece. Gosh, I hope this doesn't sound too confusing.


On a hard surface, position the grommet tool into the back of the hole...
...& hold it with one hand while hammering with the other.
This is what it looks like on the back.
This is what it looks like on the front. A nice tight squeeze!
In the blank area where the light-colored fabric was sewn, you can use a permanent marker, like a Sharpie, to enter your name, address & other info. OR, you can print out the same information on some transfer paper through your computer. Remember to print it backwards (mirror image).

Iron it on.

And you're done!!
I used some plastic cording stuff that I recycled from an older luggage tag---but you can also use those rubber/plastic bracelets that are really bendable & flexible that look exactly like my cording piece.
Give a personalized gift this holiday season! A set for a family would be super sweet! (You can leave them blank for everyone to fill out themselves if you want.)

You can also make this project without sewing. And you can decorate your luggage tag in a bajillion different ways. Have fun gettin' all creative-like! Rock on with yer crafty self!

Wednesday, October 15, 2008

New Stuff!

I've got to post my newest goodies in the shop NOW!

Firstly, I made a handful of these adorable nuggets, which I'm calling "Hoop Decor". Vintage fabric & vintage buttons are securely fastened to a wooden embroidery hoop to create some sweet & charming little pieces of art. I'm in love with that green & white polka dotted fabric. The white dots are all fuzzy & yummy! I could only find one tiny swatch of this fabric during my recent visit to the antique shops in town--poo. And I'm in love with yellow lately, so my favorite little hoop decor has to be the yellow buttons on the polka-dotty fabric.

And I think I have a super duper button collection--so these pieces feature the best of my button beauties!


And check out the latest addition to the "Writing on the Wall" Book Art collection! I love this new fold. It totally reminds me of some Art Deco wall sconces I've seen! And the cool thing about this piece is that you can hang it right-side up or upside-down for 2 different looks!

Tuesday, October 7, 2008

Super Easy Fabric Pumpkin (no sew!) Tutorial

This might just be the most easy & quick tutorial I've ever done. I got the idea from a fellow MOPS mom (Mothers of PreSchoolers) at the MOPS convention I recently returned from in Dallas. Thanks Kaci!


I gathered an assortment of appropriate autumn-colored vintage fabrics from some of my favorite vintage shopping spots. (No, this is not my fabric collection. But I'm well on my way.)


I came up with these beauties.


You'll also need to gather some thick twigs or small chubby sticks...


...& cut some leaves. These are from the grapevines we have growing out back. You could also use artificial leaves.


Here are ALL the supplies you'll need: fabric, toilet paper roll, grocery shopping or garbage bags, leaves, sticks, & scissors. (If you don't have shopping bags, you can use towels, rags, or those random missing socks from the laundry!)

The first thing you'll need to do is cut your fabric. I cut this orange fabric to 27" x 27". It is quite thick fabric, so I recommend using lightweight stuff. For the samll multi-colored pumpkin (you'll see later on in the post) I only had fabric that measured 20" x 20". It was a tight squeeze, but it worked.


Lay your fabric out on a flat surface & plunk your t.p. roll right in the center. (I use the cheapo stuff.)


Place bags all around your toilet paper roll. The more you stuff, the bigger & puffier your pumpkin will be. Who doesn't want a puffy pumpkin?


Now, grab a corner of fabric & stuff it right into the center of the toilet paper tube.


You'll gather small bits of fabric & continue to stuff them into the tube...


...until it looks like this. Now, shove the stick & leaf into the tube. This will help keep everything together. You're done!


Make a bunch of these up in coordinating colors & decorate for Fall!


I don't recommend keeping them outdoors though. This photo was just for fun!

I have been so giddy to have many, many more blog views lately. Some of my latest tutorials have been featured on Rachel's blog, One Pretty Thing. She has the coolest site. She gathers loads of tutorials from all over the www & shares them on her blog. You click & craft, it's that simple! Visit often because she posts, like, every day. So thanks, Rachel, for noticing my DIY crafty goodies!

I also found out yesterday that my Paint Chip Notebook Tutorial has been featured on CRAFT magazines craft blog! I love that place! And again, I'm giddy!

Won't you all squeal with me? Wheeeeeeeee!!!

BLOG SPECIAL! Mention this post for a $5. special on the 'WhiMSy love' Fun-For-Fall 1" Pinback Button Set!! Original price $6.25. Good through October! YAY! Cool stuff for cheap!